11. Troubleshooting 11. Troubleshooting
Häufige Probleme erkennen, selbst beheben oder gezielt den Support kontaktieren. Identify common problems, resolve them yourself or contact support effectively.
Dieses Kapitel beschreibt die häufigsten Problemsituationen im Umgang mit DS CAM, geordnet nach Arbeitsbereichen. Jede Tabelle zeigt das Symptom, die wahrscheinlichste Ursache und die empfohlene Lösung. Wenn Sie ein Problem nicht in diesem Kapitel finden, kontaktieren Sie den Support (Abschnitt 11.10). This chapter describes the most common issues when working with DS CAM, organised by work area. Each table shows the symptom, the most likely cause and the recommended solution. If you cannot find your problem in this chapter, contact support (Section 11.10).
11.1 Allgemeine Hinweise zur Fehlerbehebung 11.1 General Troubleshooting Guidelines
Fehlermeldungen und Hinweise werden in DS CAM direkt in der Benutzeroberfläche angezeigt. Bei unerwarteten Fehlern kann es zu einer Windows-Ausnahme (Exception) kommen, die einen Dialog mit technischen Detailinformationen anzeigt. Error messages and notifications in DS CAM are displayed directly in the user interface. Unexpected errors may cause a Windows exception that displays a dialog with technical detail information.
Kommt es in Ausnahmesituationen zu einem Absturz ohne Fehlermeldung, können zusätzliche Informationen aus dem Windows-Ereignisprotokoll (Event Log) entnommen werden, die dem Support bei der Analyse weiterhelfen. In exceptional cases where a crash occurs without an error message, additional information can be found in the Windows Event Log that helps support with the analysis.
Windows-Ereignisprotokoll öffnen Opening the Windows Event Log
-
Drücken Sie Win + R, geben Sie
eventvwr.mscein und bestätigen Sie mit Enter. Press Win + R, typeeventvwr.mscand confirm with Enter. - Navigieren Sie zu Windows-Protokolle → Anwendung. Navigate to Windows Logs → Application.
- Suchen Sie nach Einträgen mit der Quelle .NET Runtime oder Application Error zum Zeitpunkt des Absturzes. Look for entries with the source .NET Runtime or Application Error at the time of the crash.
- Klicken Sie auf den Eintrag und kopieren Sie den Inhalt des Reiters Details (oder fertigen Sie einen Screenshot an). Senden Sie diese Informationen an den Support. Click the entry and copy the content of the Details tab (or take a screenshot). Send this information to support.
Fehler richtig dokumentieren How to Document Errors Properly
Falls Sie den Support kontaktieren müssen, bereiten Sie bitte folgende Informationen vor: If you need to contact support, please prepare the following information:
| InformationInformation | BeschreibungDescription |
|---|---|
| DS CAM VersionDS CAM version | Die installierte Versionsnummer (sichtbar unter Help oder beim CAM-Start im Ladebildschirm).The installed version number (visible under Help or at CAM startup on the loading screen). |
| Dongle-/LizenznummerDongle/licence number | Zur eindeutigen Zuordnung Ihres Systems beim Support.For unique identification of your system by support. |
| Screenshot der FehlermeldungScreenshot of the error message | Bei Windows-Ausnahmen: Klicken Sie auf Details und kopieren Sie den angezeigten Text, oder fertigen Sie einen Screenshot an.For Windows exceptions: Click Details and copy the displayed text, or take a screenshot. |
| Screenshot des UmfeldsContext screenshot | Ein Screenshot des gesamten DS-CAM-Fensters, damit der Support erkennen kann, in welchem Dialog Sie sich befanden.A screenshot of the entire DS CAM window so that support can see which dialog you were in. |
| Schritte zur ReproduktionSteps to reproduce | Eine kurze Beschreibung der Aktionen, die zum Fehler geführt haben.A brief description of the actions that led to the error. |
| ProjektordnerProject folder |
Bei Berechnungsfehlern: Den Unterordner des betroffenen Projekts aus dem Projects-Verzeichnis. Standardmäßig liegt dieser im Installationsverzeichnis von DS CAM. Die Unterordner sind nach der Projekt-ID benannt – senden Sie nur den betroffenen Ordner (Datengröße).
For calculation errors: The subfolder of the affected project from the Projects directory. By default, this is located in the DS CAM installation directory. Subfolders are named by project ID – send only the affected folder (file size).
|
| Machines-OrdnerMachines folder |
Bei Berechnungsfehlern: Den Unterordner der betroffenen Maschine aus dem Machines-Verzeichnis. Die Unterordner sind mit einer GUID und dem Maschinennamen benannt (z.B. M{GUID}MeineMaschine).
For calculation errors: The subfolder of the affected machine from the Machines directory. Subfolders are named with a GUID and the machine name (e.g. M{GUID}MyMachine).
|
Projects und Machines an den dort eingestellten Speicherorten.
Paths changed? If you have changed the default file paths in system settings (Chapter 10.8), the Projects and Machines folders are located at the paths configured there.
11.2 Fehlerhafte Projekte 11.2 Faulty Projects
Beim Start prüft DS CAM automatisch alle vorhandenen Projekte auf Konsistenz. Wird ein fehlerhaftes Projekt erkannt, wird dieses nicht in den Scheiben-/Halter-Browser geladen, um Folgefehler zu vermeiden. Stattdessen erscheint ein Hinweis auf der Startseite. At startup, DS CAM automatically checks all existing projects for consistency. If a faulty project is detected, it is not loaded into the disc/holder browser to prevent subsequent errors. Instead, a notification appears on the landing page.
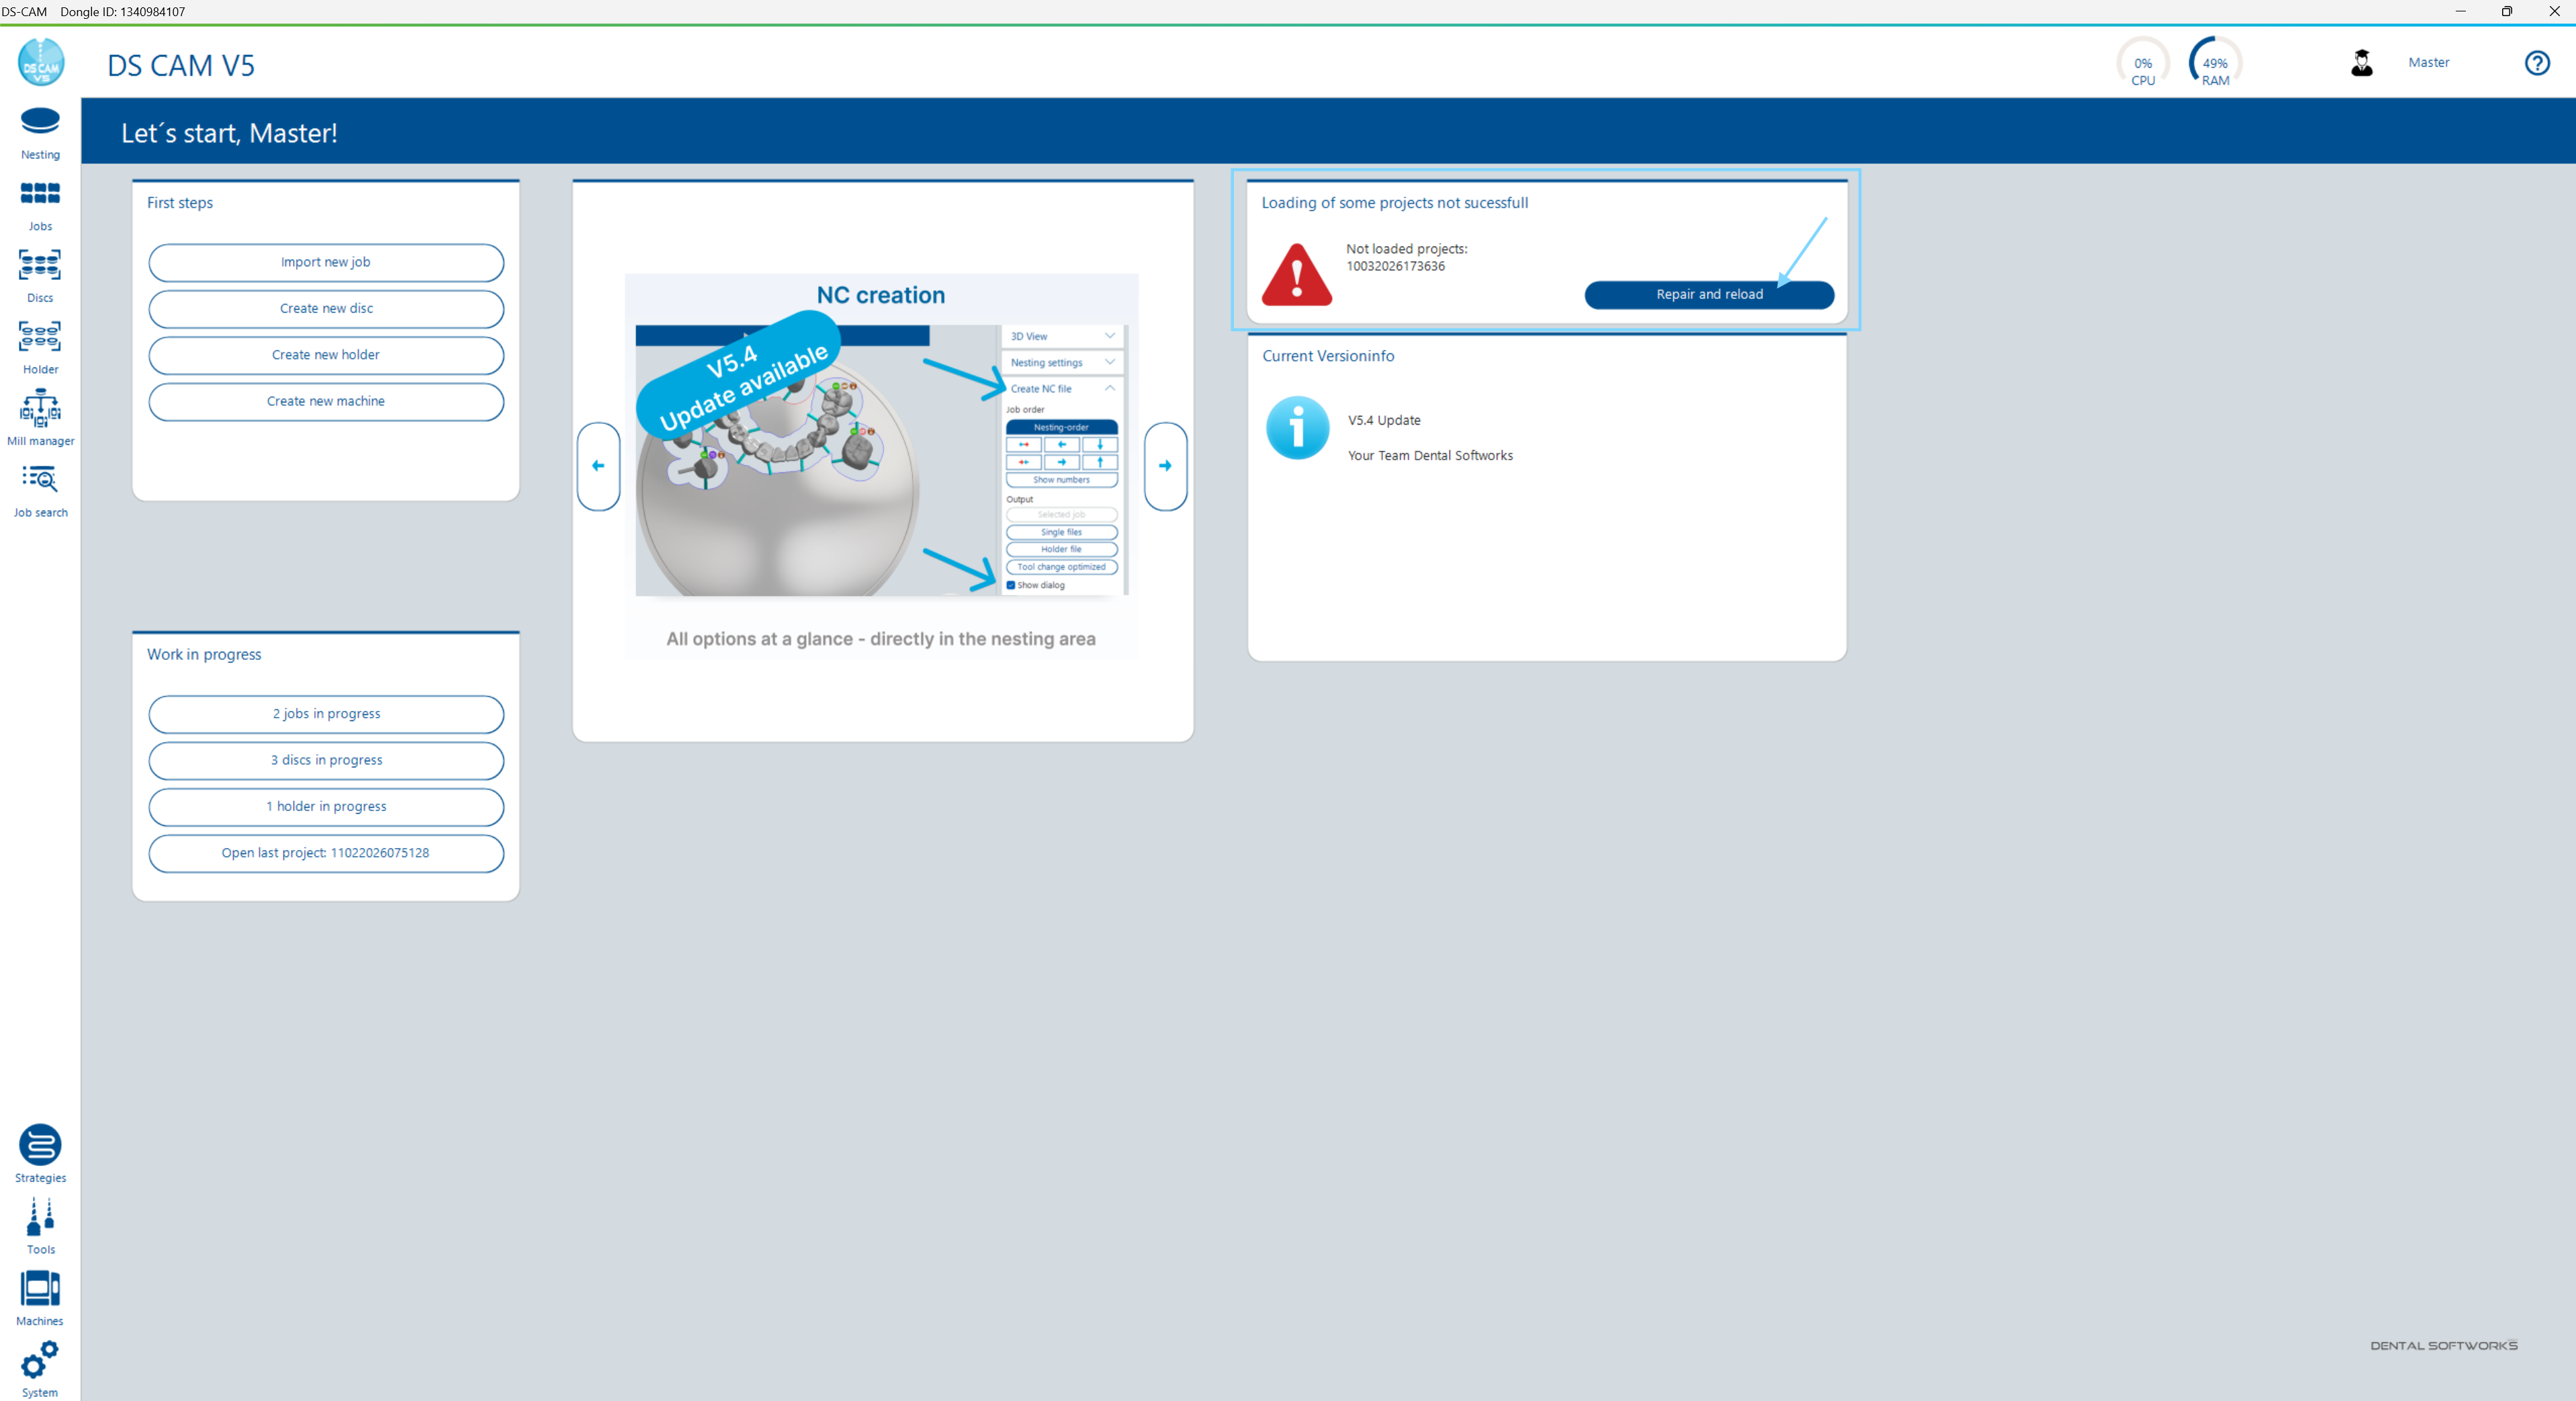
Reparatur durchführen Performing a Repair
- Klicken Sie auf der Startseite auf Reparieren und neu laden. On the landing page, click Repair and reload.
- DS CAM versucht, das Projekt zu reparieren – z.B. indem ein fehlerhafter Job oder eine beschädigte interne Datei entfernt wird. DS CAM attempts to repair the project – e.g. by removing a faulty job or a damaged internal file.
- Bei Erfolg wird das reparierte Projekt in den Browser geladen. Prüfen Sie, ob alle Jobs noch vorhanden und korrekt sind. On success, the repaired project is loaded into the browser. Check whether all jobs are still present and correct.
11.3 Import-Probleme 11.3 Import Issues
Probleme beim Importieren von Jobs treten typischerweise auf, wenn Dateien unvollständig sind oder die Zuordnung zwischen Metadaten und STL-Geometrie gestört ist. Details zum Import-Workflow finden Sie in Kapitel 3.1. Import issues typically occur when files are incomplete or the link between metadata and STL geometry is broken. For details on the import workflow, see Chapter 3.1.
| SymptomSymptom | UrsacheCause | LösungSolution |
|---|---|---|
| Metadaten-Datei wird importiert, aber es wird kein Job erstellt. Metadata file is imported, but no job is created. | Die STL-Datei fehlt im selben Ordner oder wurde umbenannt und stimmt nicht mehr mit dem in der Metadaten-Datei referenzierten Dateinamen überein. The STL file is missing from the same folder or has been renamed and no longer matches the file name referenced in the metadata file. |
|
| Preform-Abutment wird importiert, aber es wird kein Preform automatisch zugewiesen. Preform abutment is imported, but no preform is automatically assigned. | Entweder fehlen die benötigten Metadaten für die automatische Zuordnung, oder die Preform-Informationen sind in der DS-CAM-Bibliothek nicht hinterlegt. Either the required metadata for automatic assignment is missing, or the preform information is not stored in the DS CAM library. |
|
11.4 Arbeitsvorbereitung – Kurvenprobleme 11.4 Work Preparation – Curve Issues
Die korrekte Erkennung von Einschubkurven (Insertion Curves) hängt wesentlich von der Qualität der importierten STL-Geometrie ab. Details zum Directions-Schritt finden Sie in Kapitel 3.11. Correct detection of insertion curves depends significantly on the quality of the imported STL geometry. For details on the Directions step, see Chapter 3.11.
| SymptomSymptom | UrsacheCause | LösungSolution |
|---|---|---|
| Einschubkurve wird nicht automatisch erkannt und lässt sich auch nicht über Select Curve manuell setzen. Insertion curve is not automatically detected and cannot be set manually via Select Curve either. | Die Mesh-Qualität der STL-Datei ist zu gering – die Kanten sind nicht scharf genug definiert, um als Kurve erkannt zu werden. The mesh quality of the STL file is too low – the edges are not defined sharply enough to be detected as a curve. | Versuchen Sie die folgenden Schritte in dieser Reihenfolge: Try the following steps in this order: |
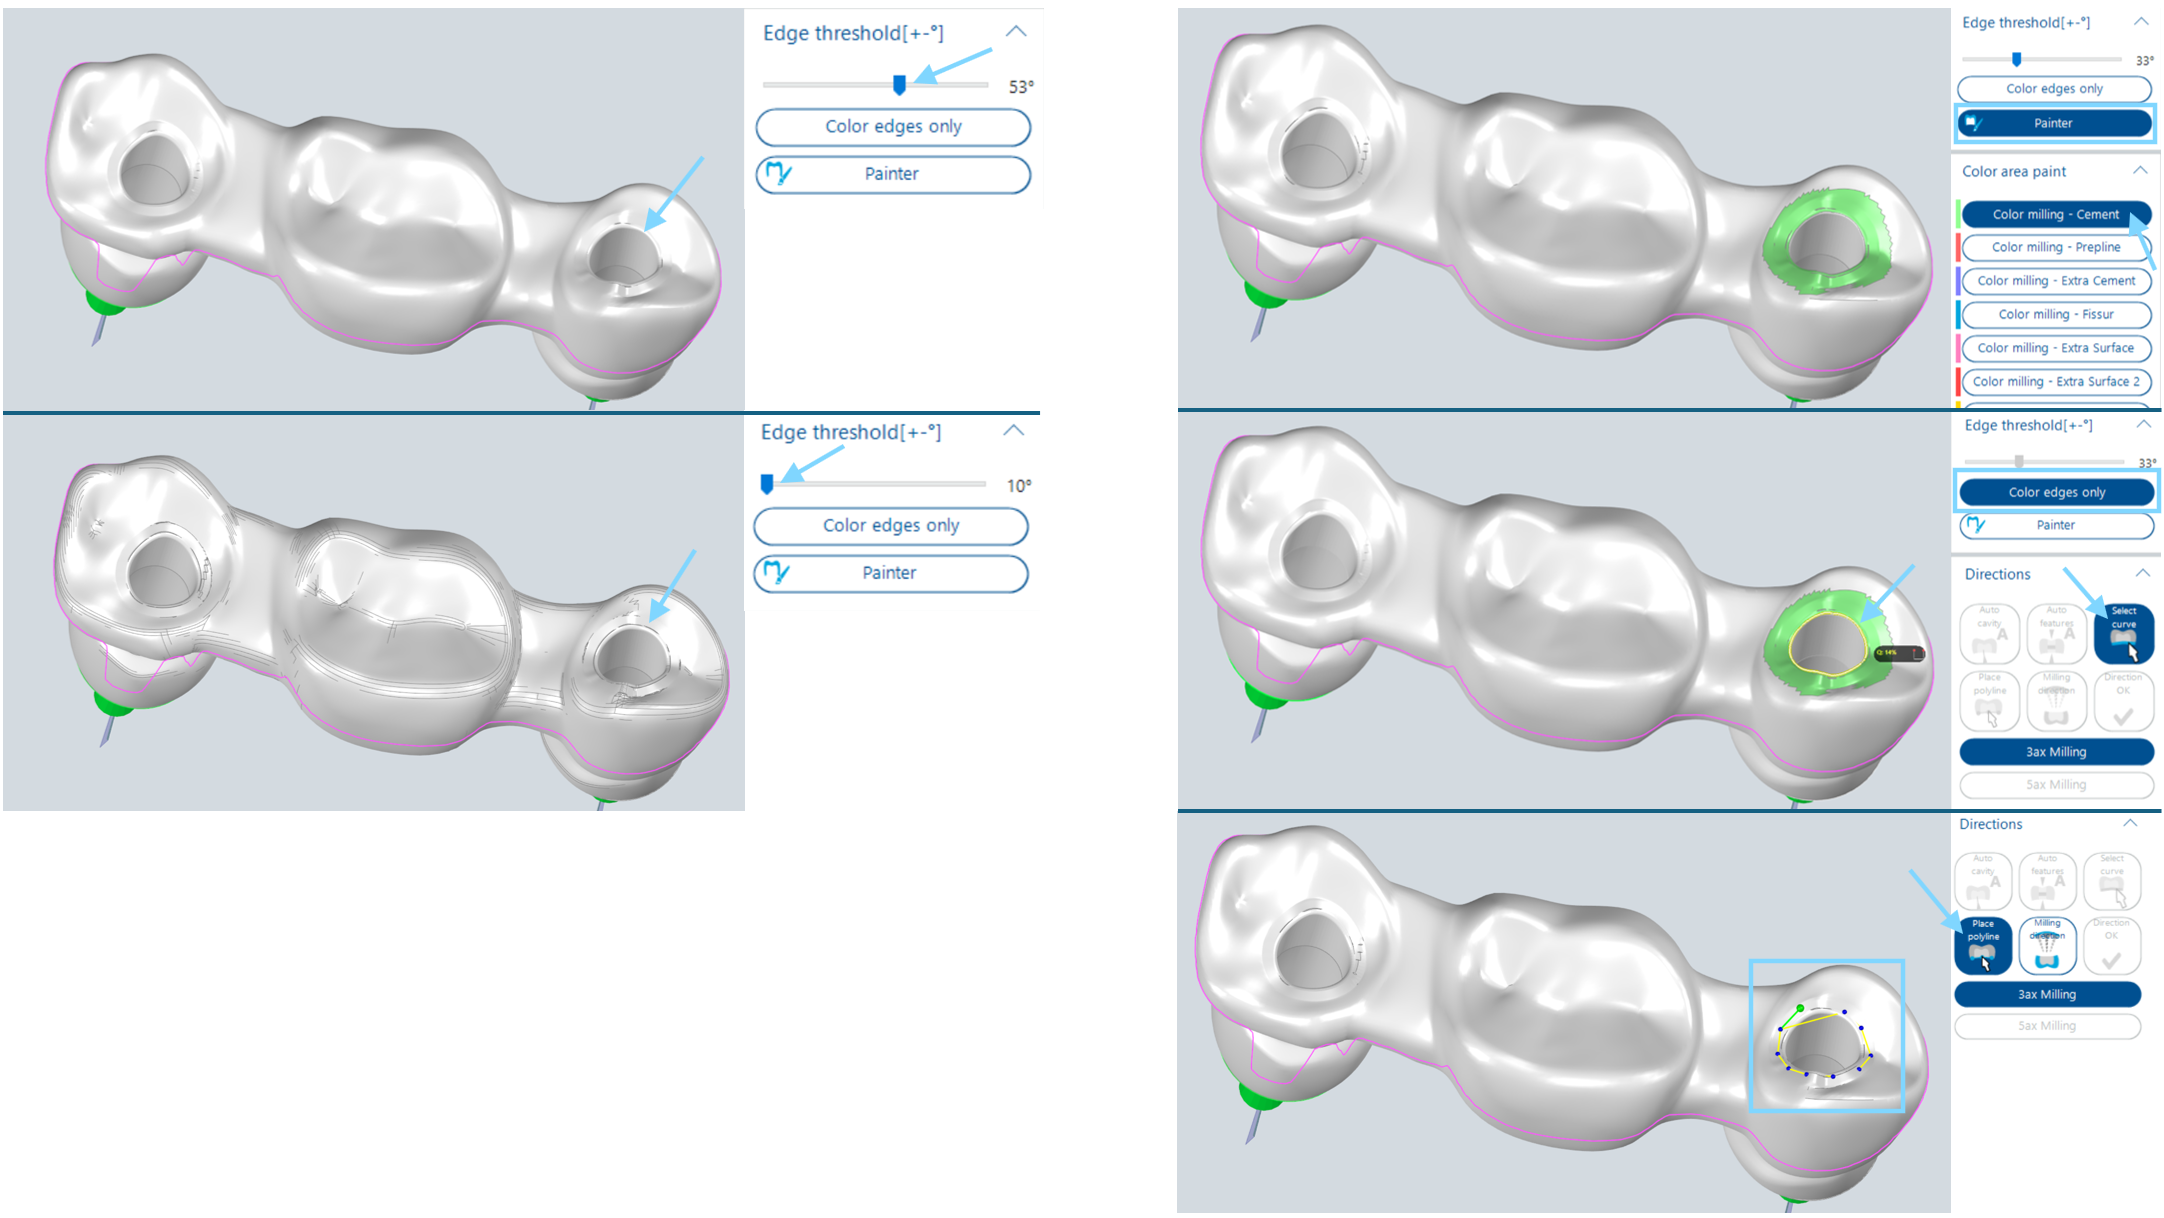
Stufenweise Lösung: Einschubkurve manuell definieren Step-by-Step Solution: Define Insertion Curve Manually
Wenn die automatische Kurvenerkennung fehlschlägt, stehen Ihnen drei Eskalationsstufen zur Verfügung: If automatic curve detection fails, three escalation levels are available:
- Kantenschwelle anpassen: Verändern Sie im Directions-Schritt der Arbeitsvorbereitung die Kantenschwelle mit dem Schieberegler. Eine niedrigere Schwelle macht die Erkennung toleranter gegenüber unscharfen Kanten. Versuchen Sie anschließend erneut, die Kurve über Select Curve zu setzen. Adjust edge threshold: In the Directions step of work preparation, change the edge threshold using the slider. A lower threshold makes detection more tolerant of blurred edges. Then try again to set the curve via Select Curve.
- Painter mit Farbrändern nutzen: Falls die Kantenschwelle nicht ausreicht, verwenden Sie den Painter-Button, um eine Fläche auf einer Seite der gewünschten Kurve einzufärben. Aktivieren Sie anschließend die Option Nur Farbränder. Dadurch werden Kurven an den Übergängen zwischen bemalten und unbemalten Flächen erkannt und über Select Curve wählbar. Use Painter with colour borders: If the edge threshold is not sufficient, use the Painter button to paint a surface on one side of the desired curve. Then activate the Colour borders only option. This detects curves at the transitions between painted and unpainted surfaces, making them selectable via Select Curve.
- Polyline manuell zeichnen: Falls auch die Farbrand-Methode nicht zum Ziel führt, zeichnen Sie die Kurve manuell über Polyline. Setzen Sie die Punkte entlang der gewünschten Kurve direkt auf der 3D-Oberfläche. Draw polyline manually: If the colour border method also does not work, draw the curve manually via Polyline. Place points along the desired curve directly on the 3D surface.
11.5 Nesting-Probleme 11.5 Nesting Issues
Probleme beim Nesting betreffen die Platzierung und Positionierung von Jobs in Scheiben oder Haltern. Details zum Nesting-Workflow finden Sie in Kapitel 5. Nesting issues concern the placement and positioning of jobs in discs or holders. For details on the nesting workflow, see Chapter 5.
| SymptomSymptom | UrsacheCause | LösungSolution |
|---|---|---|
| Job wird durch Autonesting nicht platziert. Job is not placed by Autonesting. | Der Job passt nicht in die verfügbare Scheibe (Höhe, Material oder Maschinenkompatibilität stimmen nicht überein), oder die Scheibe ist für Autonesting gesperrt. The job does not fit the available disc (height, material or machine compatibility does not match), or the disc is banned for Autonesting. |
|
| Job lässt sich in der Scheibe nicht verschieben. Job cannot be moved within the disc. | Entweder ist Move lock für den Job aktiviert, oder die Kollisionskontrolle blockiert die Bewegung (Kollision mit einem anderen Job oder dem Fräsbereichsrand). Either Move lock is activated for the job, or collision control is blocking the movement (collision with another job or the milling area boundary). |
|
| Kollisionsmeldung mit einem anderen Job oder dem Fräsbereich der Scheibe. Collision notification with another job or the disc milling area. | Die Fräsbahnen des Jobs würden ein anderes Objekt oder den Scheibenrand verletzen. Die Kollisionskontrolle prüft nicht die Objekte selbst, sondern deren Fräsbereiche. The milling paths of the job would violate another object or the disc boundary. Collision control checks the milling areas, not the objects themselves. | Vergrößern Sie den Abstand zwischen den Jobs oder positionieren Sie den Job näher zur Scheibenmitte. Increase the distance between jobs or move the job closer to the disc centre. |
11.6 Berechnung und NC-Ausgabe 11.6 Calculation and NC Output
Probleme in diesem Bereich betreffen die Fräsbahnberechnung und die Erzeugung von NC-Dateien. Details zur Berechnung finden Sie in Kapitel 5.13, zur NC-Ausgabe in Kapitel 6.6 und zum Posting-Dialog in Kapitel 6.7. Issues in this area concern milling path calculation and NC file generation. For calculation details, see Chapter 5.13; for NC output, see Chapter 6.6 and the posting dialog in Chapter 6.7.
| SymptomSymptom | UrsacheCause | LösungSolution |
|---|---|---|
| Berechnung schlägt fehl oder liefert kein Ergebnis. Calculation fails or produces no result. | Die Ursachen können vielfältig sein: fehlende oder fehlerhafte Strategie-/Werkzeugkonfiguration, problematische Geometrie oder Softwarefehler. Causes can vary: missing or faulty strategy/tool configuration, problematic geometry or software error. |
|
| NC-Datei wird erstellt, aber der Ausgabeort kann nicht erreicht werden. NC file is created, but the output location cannot be reached. | Der in den Maschineneinstellungen konfigurierte NC-Ausgabepfad ist nicht erreichbar (Netzlaufwerk getrennt, Ordner gelöscht, fehlende Zugriffsrechte). The NC output path configured in machine settings is not reachable (network drive disconnected, folder deleted, missing access rights). |
|
| NC-Datei kann nicht erstellt werden – Dateiname zu lang. NC file cannot be created – file name too long. | Der vollständige Dateipfad (Ordner + Dateiname) überschreitet die Windows-Beschränkung von 260 Zeichen. DS CAM zeigt in diesem Fall einen entsprechenden Hinweis an. The full file path (folder + file name) exceeds the Windows limit of 260 characters. DS CAM displays a corresponding notification in this case. |
|
11.7 Ansichtsprobleme (Grafikkarte) 11.7 Display Issues (Graphics Card)
DS CAM benötigt eine NVIDIA-Grafikkarte mit mindestens 2 GB DDR5 (vgl. Kapitel 10.1). Wenn die Grafikkarte nicht korrekt für DS CAM konfiguriert ist, können Darstellungsfehler auftreten. DS CAM requires an NVIDIA graphics card with at least 2 GB DDR5 (see Chapter 10.1). If the graphics card is not correctly configured for DS CAM, display errors may occur.
| SymptomSymptom | UrsacheCause | LösungSolution |
|---|---|---|
| Metallisch gerenderte Objekte (z.B. Halter) werden nicht angezeigt. Metallic rendered objects (e.g. holders) are not displayed. | Die NVIDIA-Hochleistungsgrafikkarte ist nicht für DS CAM aktiviert. Windows verwendet stattdessen die integrierte Grafik (Intel), die bestimmte Rendering-Funktionen nicht unterstützt. The NVIDIA high-performance graphics card is not activated for DS CAM. Windows is using the integrated graphics (Intel) instead, which does not support certain rendering functions. | Weisen Sie die NVIDIA-Hochleistungsgrafikkarte manuell dem DS-CAM-Programm zu: Manually assign the NVIDIA high-performance graphics card to the DS CAM program: |
NVIDIA-Grafikkarte für DS CAM aktivieren Activate NVIDIA Graphics Card for DS CAM
- Öffnen Sie die Windows-Einstellungen → System → Bildschirm → Grafikeinstellungen (oder suchen Sie nach „Grafikeinstellungen" im Startmenü). Open Windows Settings → System → Display → Graphics settings (or search for "Graphics settings" in the Start menu).
-
Klicken Sie auf Durchsuchen und wählen Sie die DS-CAM-Programmdatei (
.exe) aus dem Installationsverzeichnis. Click Browse and select the DS CAM program file (.exe) from the installation directory. - Klicken Sie auf Optionen und wählen Sie Hohe Leistung (NVIDIA). Click Options and select High performance (NVIDIA).
- Starten Sie DS CAM neu. Restart DS CAM.
11.8 Update- und Lizenzprobleme 11.8 Update and Licence Issues
Probleme mit Updates und Lizenzen hängen häufig mit der Netzwerkkonfiguration oder dem USB-Dongle zusammen. Details zu Updates finden Sie in Kapitel 10.5, zur Lizenzierung in Kapitel 10.6. Update and licence issues are often related to network configuration or the USB dongle. For update details, see Chapter 10.5; for licensing, see Chapter 10.6.
Update-Probleme Update Issues
| SymptomSymptom | UrsacheCause | LösungSolution |
|---|---|---|
| Es werden keine Updates angezeigt, obwohl eine neue Version verfügbar sein sollte. No updates are shown even though a new version should be available. | Port 22 (für Software-Updates) ist in der Firewall blockiert. DS CAM kann den Update-Server nicht erreichen. Port 22 (for software updates) is blocked by the firewall. DS CAM cannot reach the update server. | Stellen Sie sicher, dass Port 22 in der Firewall für ausgehende Verbindungen freigegeben ist. Kontaktieren Sie Ihre IT-Abteilung, falls nötig. Ensure that Port 22 is allowed for outgoing connections in the firewall. Contact your IT department if necessary. |
| Update-Download schlägt fehl oder bricht ab. Update download fails or is interrupted. | Instabile oder unterbrochene Internetverbindung beim Download. Unstable or interrupted internet connection during download. |
|
| Update-Installation läuft in einen Fehler – einzelne Pakete konnten nicht installiert werden. Update installation runs into an error – individual packages could not be installed. | Einzelne Installationspakete konnten nicht korrekt entpackt oder installiert werden. DS CAM zeigt einen Hinweis mit Details an. Individual installation packages could not be extracted or installed correctly. DS CAM displays a notification with details. | Kontaktieren Sie den Support (Abschnitt 11.10) und senden Sie den angezeigten Hinweistext mit. Contact support (Section 11.10) and include the displayed notification text. |
Lizenz- und Dongle-Probleme Licence and Dongle Issues
| SymptomSymptom | UrsacheCause | LösungSolution |
|---|---|---|
| „HASP Dongle not found" beim Start von DS CAM. "HASP Dongle not found" when starting DS CAM. | Der USB-Dongle wird nicht erkannt – möglicherweise unzureichende Stromversorgung am USB-Port oder ein defekter USB-Hub. The USB dongle is not detected – possibly insufficient power supply at the USB port or a defective USB hub. |
|
| „Lizenz abgelaufen" oder „Lizenz nicht vorhanden" beim Start. "Licence expired" or "Licence not found" at startup. | Die auf dem Dongle gespeicherte Lizenz ist abgelaufen oder enthält nicht die benötigten Berechtigungen. The licence stored on the dongle has expired or does not contain the required permissions. | Kontaktieren Sie den Support oder Ihren Reseller (Abschnitt 11.10) zur Lizenzerneuerung. Contact support or your reseller (Section 11.10) for licence renewal. |
| Lizenz-Update wird nicht gefunden. Licence update is not found. | Port 8444 (für Lizenz-Updates) ist in der Firewall blockiert. Port 8444 (for licence updates) is blocked by the firewall. | Stellen Sie sicher, dass Port 8444 in der Firewall für ausgehende Verbindungen freigegeben ist. Kontaktieren Sie Ihre IT-Abteilung, falls nötig. Ensure that Port 8444 is allowed for outgoing connections in the firewall. Contact your IT department if necessary. |
11.9 Bekannte Einschränkungen 11.9 Known Limitations
Die folgenden Einschränkungen sind bekannt und erfordern keine Aktion. Sie können während der normalen Arbeit auftreten und stellen keinen Fehler dar. The following limitations are known and do not require action. They may occur during normal work and do not represent errors.
| BereichArea | EinschränkungLimitation | ErläuterungExplanation |
|---|---|---|
| Simulation Simulation | Beim Entfernen des Restmaterialblocks kann ein Schnitt durch den Job angezeigt werden. When removing the residual material block, a cut through the job may be displayed. | Dies ist ein rein grafischer Darstellungsfehler der Funktion „Restmaterial entfernen" und hat keinen Einfluss auf die Berechnung oder die NC-Ausgabe. Die tatsächlichen Fräsbahnen sind korrekt. This is a purely visual rendering artefact of the "Remove residual material" function and has no impact on the calculation or NC output. The actual milling paths are correct. |
11.10 Support kontaktieren 11.10 Contact Support
Wenn Sie ein Problem mit den Hinweisen in diesem Kapitel nicht lösen können, steht Ihnen der Support zur Verfügung. If you cannot resolve an issue with the information in this chapter, support is available to assist you.
Erster Ansprechpartner: Ihr Reseller First Point of Contact: Your Reseller
Grundsätzlich ist Ihr Reseller (Vertriebspartner) der erste Ansprechpartner bei Fragen und Problemen. Dieser kann viele Themen direkt klären und leitet komplexere Fälle bei Bedarf an Dental Softworks weiter. As a general rule, your reseller (distribution partner) is the first point of contact for questions and problems. They can resolve many issues directly and will escalate more complex cases to Dental Softworks when necessary.
Dental Softworks Support Dental Softworks Support
| KontaktwegContact Channel | DetailsDetails |
|---|---|
| Ticketsystem (empfohlen)Ticket system (recommended) | Über die Dental Softworks Homepage: dental-softworks.com. Das Ticketsystem ermöglicht eine strukturierte Bearbeitung und Nachverfolgung Ihres Anliegens. Via the Dental Softworks website: dental-softworks.com. The ticket system allows structured handling and tracking of your request. |
| support@dental-softworks.com – eine E-Mail an diese Adresse erstellt automatisch ein Support-Ticket. support@dental-softworks.com – an email to this address automatically creates a support ticket. |
Checkliste: Was Sie dem Support mitteilen sollten Checklist: What to Include When Contacting Support
Je vollständiger Ihre Angaben sind, desto schneller kann der Support Ihnen helfen. Bereiten Sie folgende Informationen vor (vgl. Abschnitt 11.1): The more complete your information, the faster support can help you. Prepare the following information (see Section 11.1):
- DS CAM VersionsnummerDS CAM version number
- Dongle-/LizenznummerDongle/licence number
- Screenshot der Fehlermeldung (bei Windows-Ausnahmen: Detail-Text kopieren oder Screenshot)Screenshot of the error message (for Windows exceptions: copy detail text or take screenshot)
- Screenshot des Umfelds (gesamtes DS-CAM-Fenster)Context screenshot (entire DS CAM window)
- Schritte zur Reproduktion (was haben Sie getan, bevor der Fehler auftrat?)Steps to reproduce (what did you do before the error occurred?)
- Projektordner + Machines-Ordner (nur bei Berechnungsfehlern, nur den betroffenen Unterordner)Project folder + Machines folder (only for calculation errors, only the affected subfolder)