10. System 10. System
Systemvoraussetzungen, Installation, Login, Updates, Lizenzierung, Benutzer- und Systemeinstellungen. System requirements, installation, login, updates, licensing, user and system settings.
Dieses Kapitel behandelt alles rund um die Einrichtung und Konfiguration von DS CAM – von den Systemvoraussetzungen und der Installation über das Login-System und die Lizenzierung bis hin zu den Benutzer- und Systemeinstellungen. Während die vorangegangenen Kapitel den täglichen Workflow beschreiben, finden Sie hier die Grundlagen für den reibungslosen Betrieb der Software. This chapter covers everything related to the setup and configuration of DS CAM – from system requirements and installation through the login system and licensing to user and system settings. While the previous chapters describe the daily workflow, here you will find the fundamentals for smooth operation of the software.
10.1 Systemvoraussetzungen 10.1 System Requirements
Für den Betrieb von DS CAM V5.4 sind folgende Mindestanforderungen erforderlich: The following minimum requirements apply for running DS CAM V5.4:
| KomponenteComponent | AnforderungRequirement |
|---|---|
| ProzessorProcessor | Intel Core i7 oder Intel Xeon (min. 4 Kerne + Hyperthreading)Intel Core i7 or Intel Xeon (min. 4 cores + Hyperthreading) |
| BetriebssystemOperating System | Windows 11 Pro 64-Bit |
| BildschirmauflösungScreen Resolution | Min. 1920 × 1080Min. 1920 × 1080 |
| GrafikkarteGraphics Card | NVIDIA, min. 2 GB DDR5 Speicher (CUDA-Unterstützung empfohlen)NVIDIA, min. 2 GB DDR5 memory (CUDA support recommended) |
| ArbeitsspeicherRAM | Min. 8 GB (1333 MHz)Min. 8 GB (1333 MHz) |
| FestplatteStorage | Min. 100 GB frei, SSD empfohlenMin. 100 GB free, SSD recommended |
| EingabegerätInput Device | Maus mit Scroll-RadMouse with scroll wheel |
| NetzwerkNetwork | Freier Internetzugang (Port 22 für Software-Updates, Port 8444 für Lizenz-Updates)Internet access (Port 22 for software updates, Port 8444 for licence updates) |
| LizenzLicence | Gültiger Software-Lizenz-Dongle (USB)Valid software licence dongle (USB) |
10.2 Installation 10.2 Installation
DS CAM wird je nach Kundenstatus unterschiedlich bereitgestellt: DS CAM is delivered differently depending on customer status:
| KundentypCustomer Type | LieferumfangDelivery |
|---|---|
| NeukundeNew Customer | Software-Lizenz-Dongle mit ErstlizenzSoftware licence dongle with initial licence |
| BestandskundeExisting Customer | Update zu einer früheren Software-VersionUpdate from a previous software version |
Der Software-Installer steht im Download-Bereich auf www.dental-softworks.com/downloads bereit. The software installer is available in the download area at www.dental-softworks.com/en/downloads.
10.3 Software starten und beenden 10.3 Starting and Closing the Software
Software starten Starting the Software
Starten Sie DS CAM per Doppelklick auf das CAM-Icon auf dem Desktop. Beim Start durchläuft die Software folgende Schritte: Start DS CAM by double-clicking the CAM icon on the desktop. At startup, the software goes through the following steps:
- Login-Fenster: Falls der zuletzt angemeldete Benutzer ein Passwort benötigt (oder beim ersten Start nach der Installation), erscheint das Login-Fenster. Wählen Sie den gewünschten Benutzer und geben Sie bei Bedarf das Passwort ein (Details siehe Abschnitt 10.4). Login window: If the last logged-in user requires a password (or on first start after installation), the login window appears. Select the desired user and enter the password if required (details in Section 10.4).
- Nutzungsbedingungen: Beim ersten Start erscheint das „Terms and Conditions"-Fenster. Bestätigen Sie die Nutzungsbedingungen. Über die Checkbox „Do not show again" wird das Fenster bei zukünftigen Starts übersprungen. Terms and Conditions: On first start, the "Terms and Conditions" window appears. Confirm the terms. The "Do not show again" checkbox skips this window on future starts.
- Ladebildschirm: DS CAM lädt alle notwendigen Daten im Hintergrund. Je mehr Projekte vorhanden sind oder je langsamer die Datenquelle (z.B. bei Netzwerkablage), desto länger kann der Start dauern. Der Fortschritt wird unten links angezeigt. Loading screen: DS CAM loads all necessary data in the background. The more projects exist or the slower the data source (e.g. network storage), the longer the start takes. Progress is shown in the lower left.
- Update- und Lizenzprüfung: Bei jedem Start prüft DS CAM automatisch, ob Software-Updates oder Lizenz-Updates verfügbar sind. Update and licence check: At every start, DS CAM automatically checks for available software updates and licence updates.
- Startseite: Nach erfolgreichem Laden erscheint die Startseite (Landing Page) mit Schnelleinstiegen, Statusübersichten und Update-Informationen. Landing page: After successful loading, the landing page appears with quick actions, status overviews and update information.

Software beenden Closing the Software
Schließen Sie DS CAM über das rote X in der rechten oberen Ecke. Beim Beenden werden alle notwendigen Speicheroperationen automatisch ausgeführt – ein manuelles Speichern ist nicht erforderlich. Close DS CAM via the red X in the upper right corner. On closing, all necessary save operations are performed automatically – manual saving is not required.
10.4 Login und Benutzer 10.4 Login and Users
DS CAM verwendet ein rollenbasiertes Berechtigungssystem. Nach der Installation stehen drei Standard-Benutzer zur Verfügung: DS CAM uses a role-based permission system. After installation, three default users are available:
| BenutzerUser | PasswortPassword | RolleRole | BeschreibungDescription |
|---|---|---|---|
| User | KeinesNone | CAM-AnwenderCAM Operator | Standard-Arbeitsbenutzer für den täglichen Workflow. Hat Zugriff auf alle Arbeitsbereiche (Jobs, Nesting, Simulation, Posting).Default working user for the daily workflow. Has access to all work areas (Jobs, Nesting, Simulation, Posting). |
| Support | GeschütztProtected | First Level SupportFirst Level Support | Erweiterter Zugriff auf Servicebereiche in den Dialogen (z.B. Maschineneinstellungen, Migration, Update-Verwaltung).Extended access to service areas in the dialogs (e.g. machine settings, migration, update management). |
| Master | GeschütztProtected | Second Level SupportSecond Level Support | Gibt alle Einstellungen der Software frei. Es kann nur einen Master-Account geben – dieser ist Dental Softworks vorbehalten.Unlocks all software settings. Only one master account can exist – this is reserved for Dental Softworks. |
Über den Button Change user account in den Benutzereinstellungen (Profile) können Sie den aktiven Benutzer wechseln. Wird DS CAM mit dem Benutzer „User" (ohne Passwort) geschlossen, erscheint beim nächsten Start kein Login-Fenster – die Software startet direkt. Ist die Checkbox Direct login if password is empty aktiviert, entfällt das Login für passwortfreie Benutzer. Use the Change user account button in User Settings (Profile) to switch the active user. If DS CAM is closed with the "User" account (no password), the login window does not appear on the next start – the software starts directly. If the Direct login if password is empty checkbox is enabled, the login is skipped for password-free users.
10.5 Software-Updates 10.5 Software Updates
DS CAM prüft bei jedem Start automatisch, ob neue Updates verfügbar sind. Zusätzlich können Sie jederzeit manuell nach Updates suchen. Es gibt zwei Arten von Updates: DS CAM automatically checks for new updates at every start. You can also search for updates manually at any time. There are two types of updates:
| Update-TypUpdate Type | PortPort | BeschreibungDescription |
|---|---|---|
| Software-UpdateSoftware Update | 22 | Neue Programmversion von DS CAM. Wird auf der Startseite angezeigt und kann von dort heruntergeladen und installiert werden.New program version of DS CAM. Displayed on the landing page and can be downloaded and installed from there. |
| Lizenz-UpdateLicence Update | 8444 | Aktualisierung der Lizenzinformationen auf dem Dongle (z.B. neue Maschinenfreischaltungen, Add-ons). Nach einem Lizenz-Update muss die CAM zwingend neu gestartet werden.Update of the licence information on the dongle (e.g. new machine activations, add-ons). After a licence update, the CAM must be restarted. |
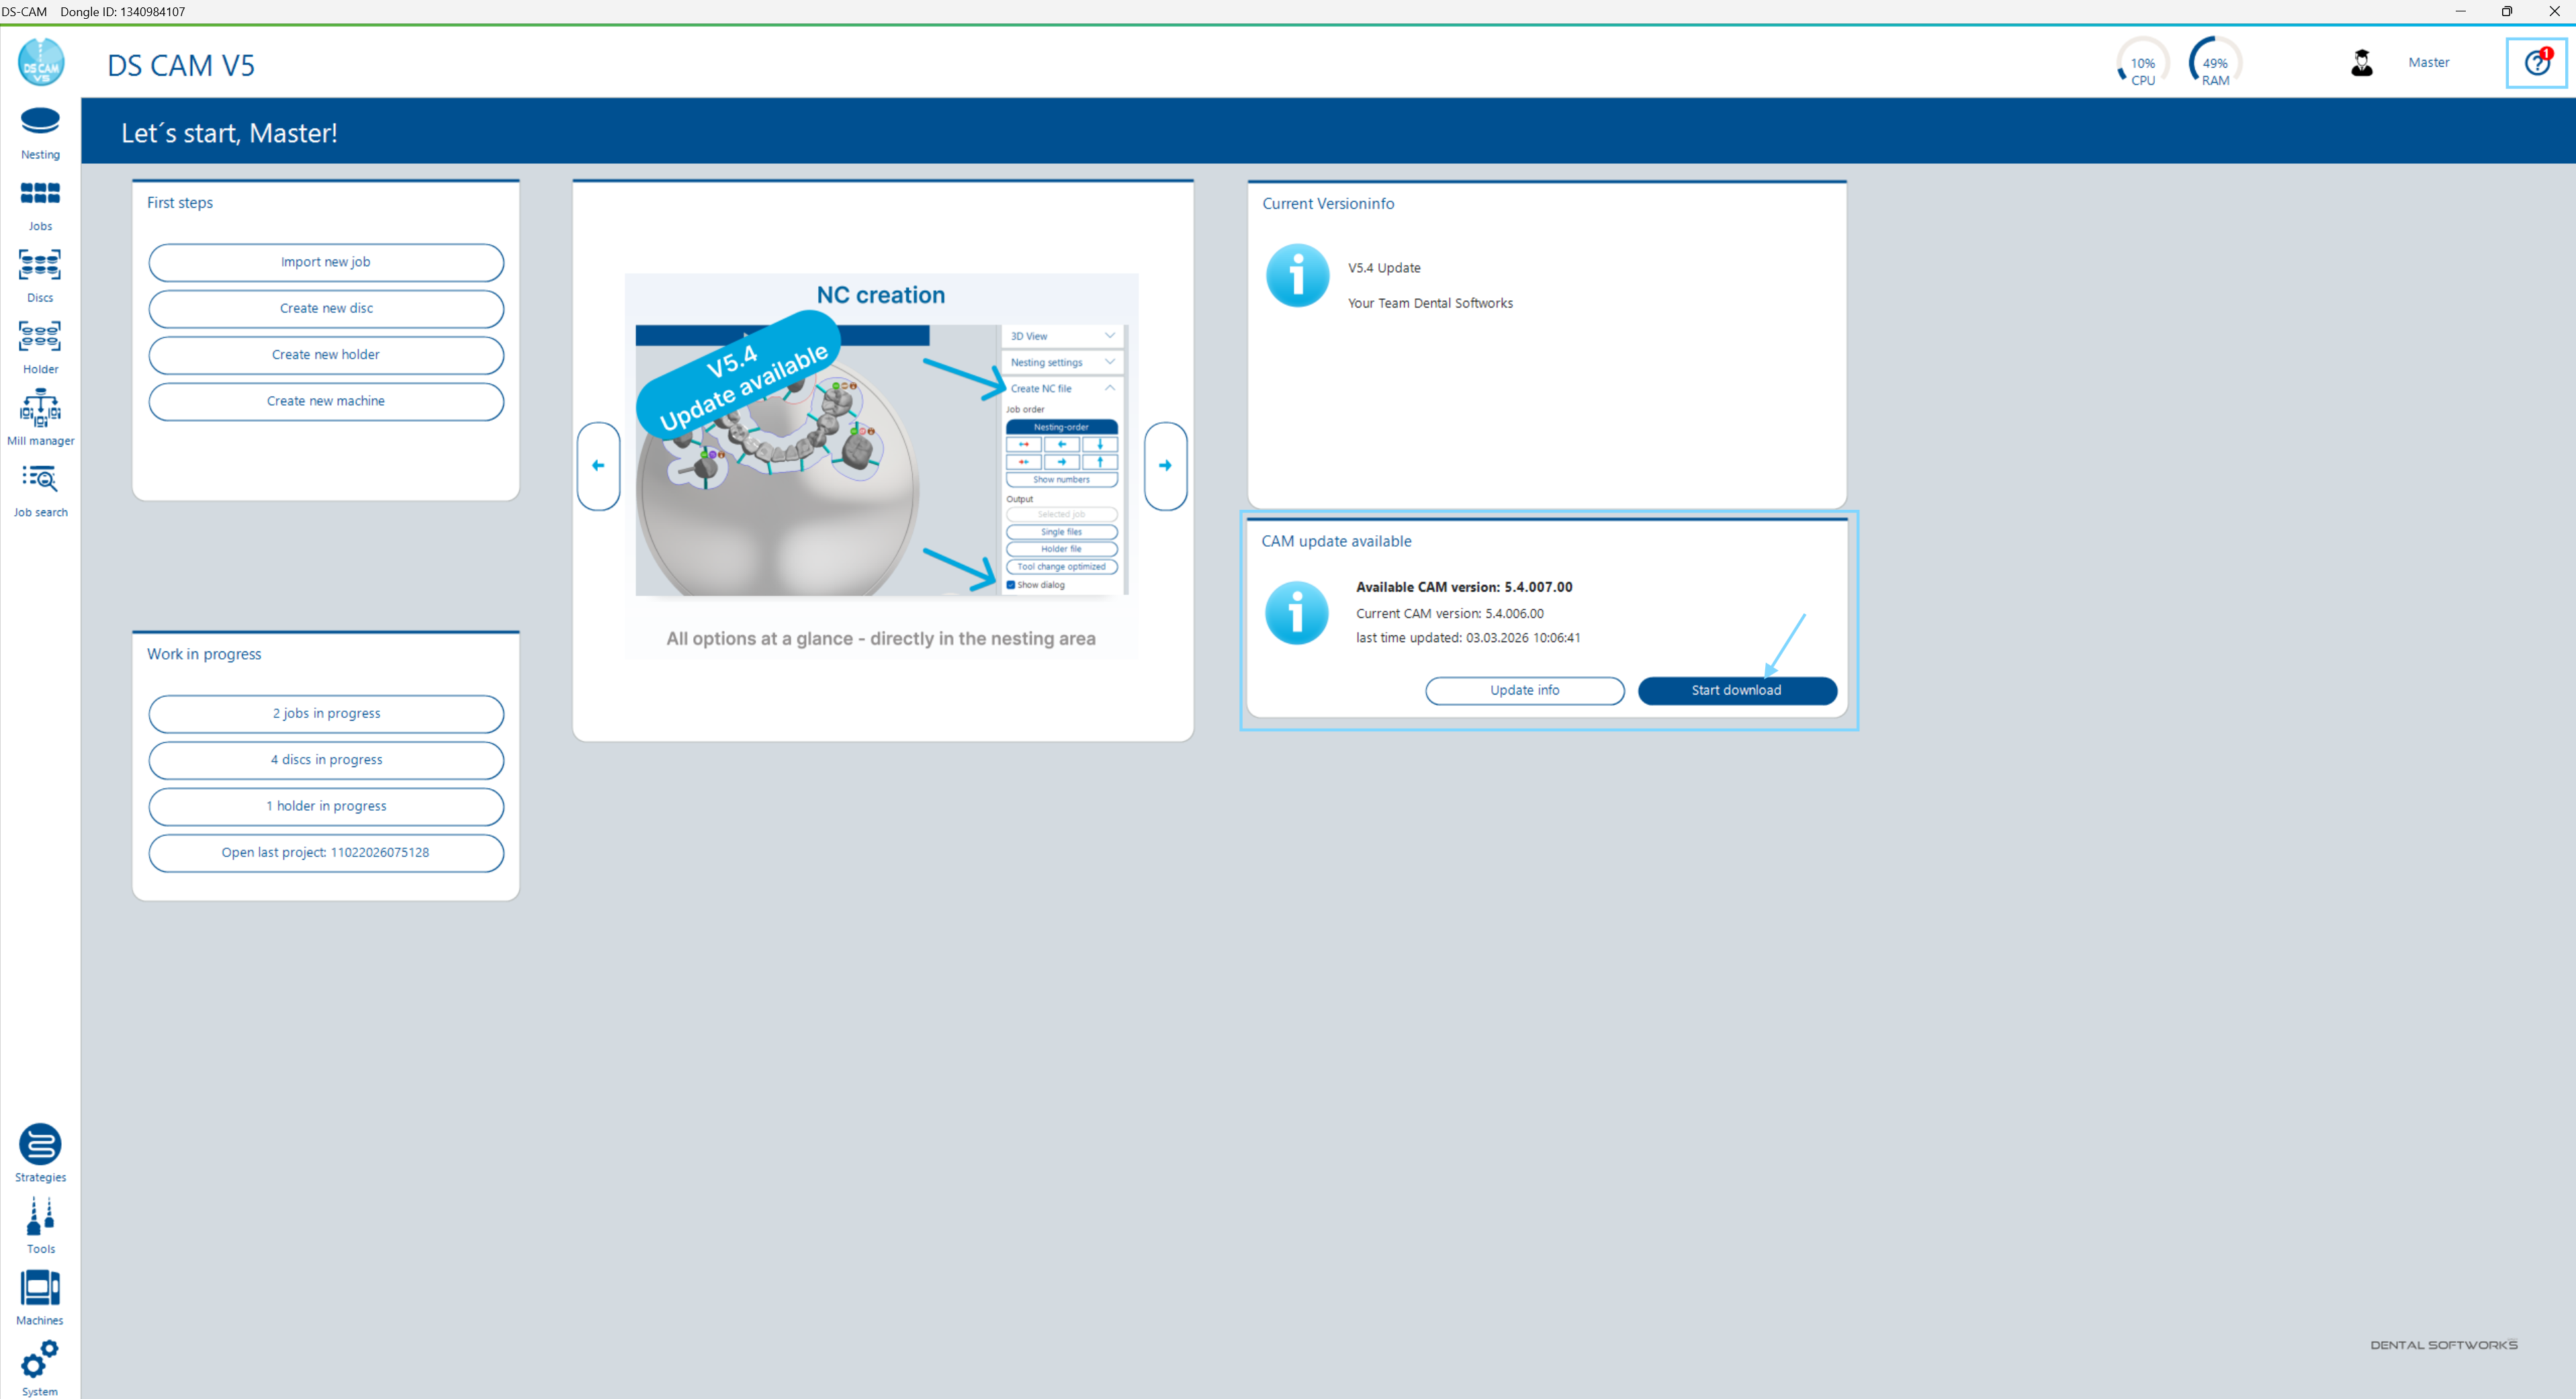
Update-Anzeige auf der Startseite Update Display on the Landing Page
Verfügbare Updates werden direkt auf der Startseite angezeigt. Von dort können Sie: Available updates are displayed directly on the landing page. From there you can:
- Den Download des Updates startenStart the update download
- Das Update später installierenInstall later
- Über den Update Info Button detaillierte Informationen anzeigenView detailed information via the Update Info button
Wenn Sie sich in einem anderen Arbeitsfenster befinden, wird ein verfügbares Update durch eine rote Markierung am Help-Dialog-Button im Header angezeigt. Der Download-Fortschritt wird sowohl im Header als auch im Help-Dialog angezeigt. When you are in a different work area, an available update is indicated by a red badge on the Help dialog button in the header. Download progress is shown in both the header and the Help dialog.
10.6 Lizenzierung 10.6 Licensing
Die Nutzung von DS CAM ist nur mit einem gültigen Lizenz-Dongle (USB) möglich. Der Dongle muss während der gesamten Nutzungsdauer am Rechner angeschlossen bleiben. DS CAM can only be used with a valid licence dongle (USB). The dongle must remain connected to the computer during the entire usage period.
Der Dongle definiert, welche Funktionen und wie viele Maschinen freigeschaltet sind. Die aktuelle Lizenzauslastung sehen Sie in der Maschinenübersicht (Kapitel 9) in der Statusleiste. The dongle defines which functions and how many machines are activated. The current licence utilisation is shown in the Machine Overview (Chapter 9) status bar.
10.7 Benutzereinstellungen 10.7 User Settings
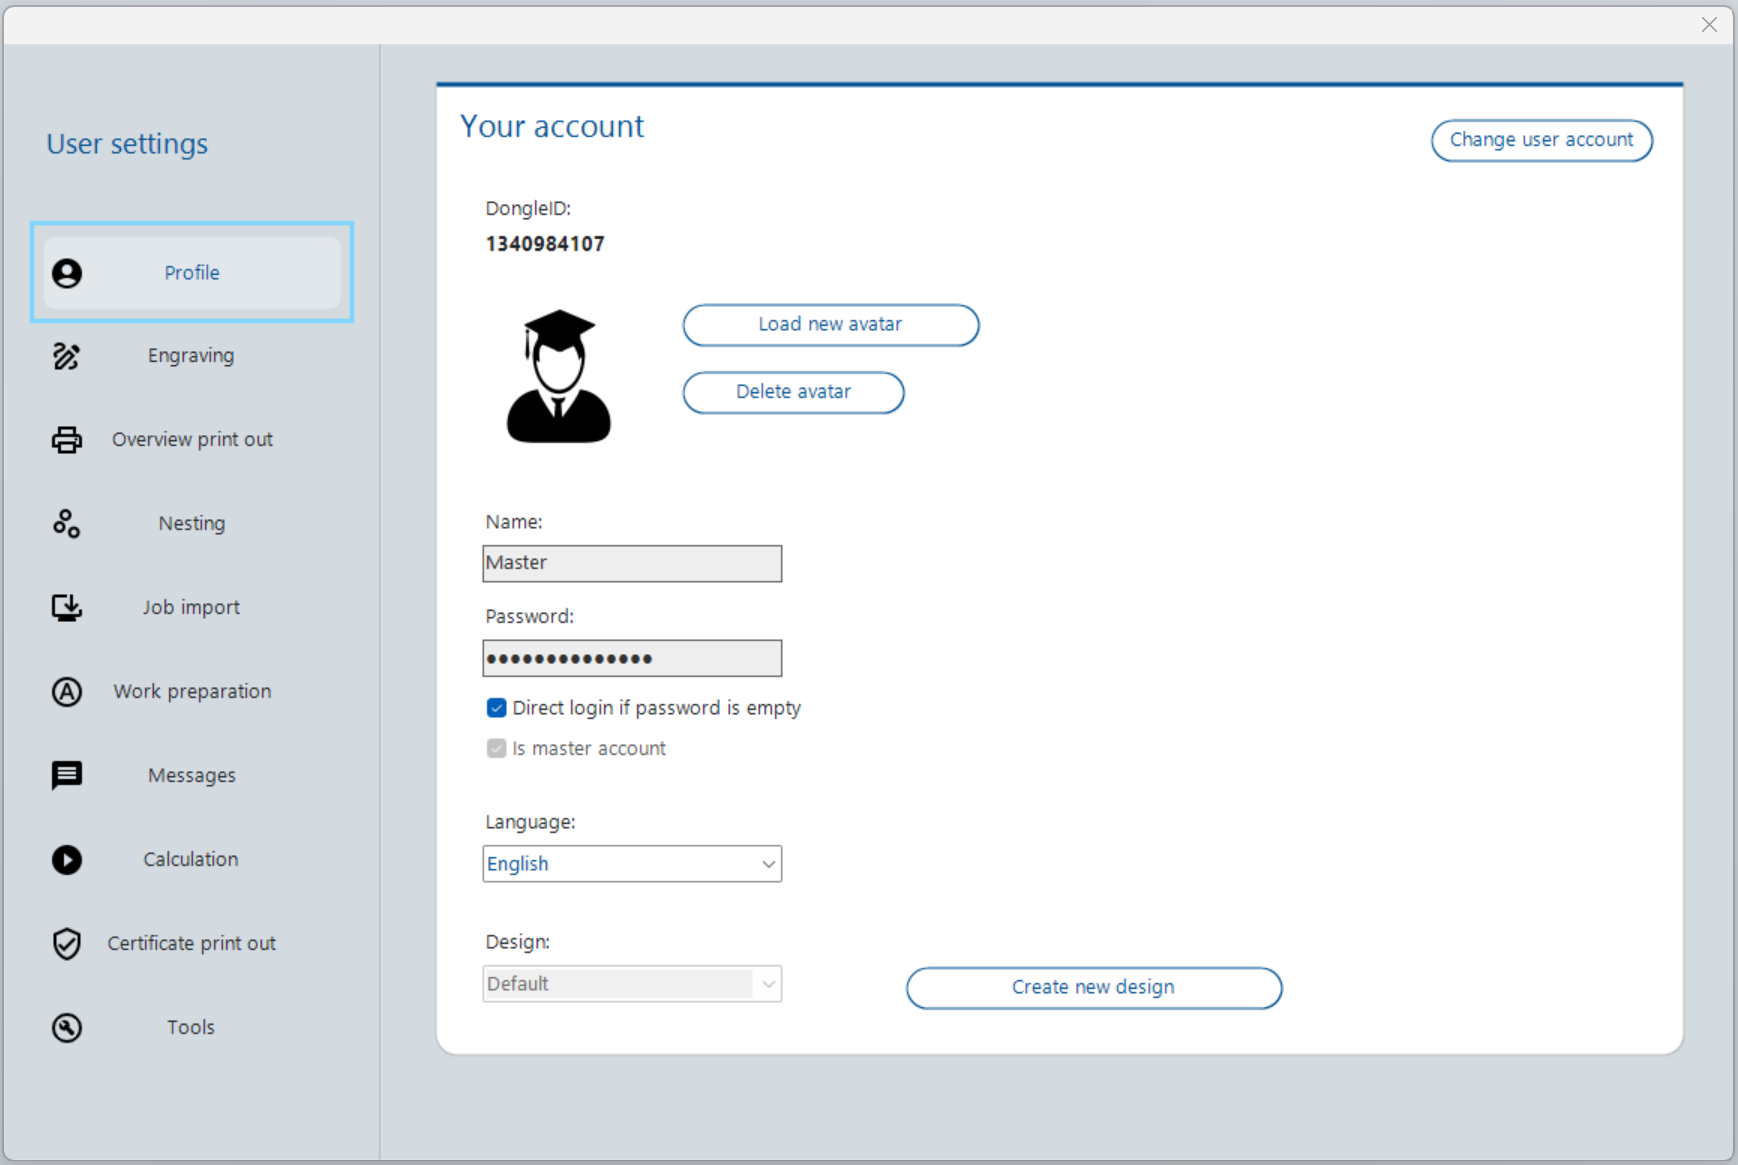
Die Benutzereinstellungen öffnen Sie über den Avatar oder den danebenstehenden Benutzernamen im Header (rechts). Sie gelten pro Benutzer – jeder der drei Standard-Benutzer (User, Support, Master) kann eigene Einstellungen haben. Der Dialog enthält 10 Kategorien im linken Menü: Open the User Settings by clicking the avatar or the adjacent username in the header (right). They apply per user – each of the three default users (User, Support, Master) can have their own settings. The dialog contains 10 categories in the left menu:
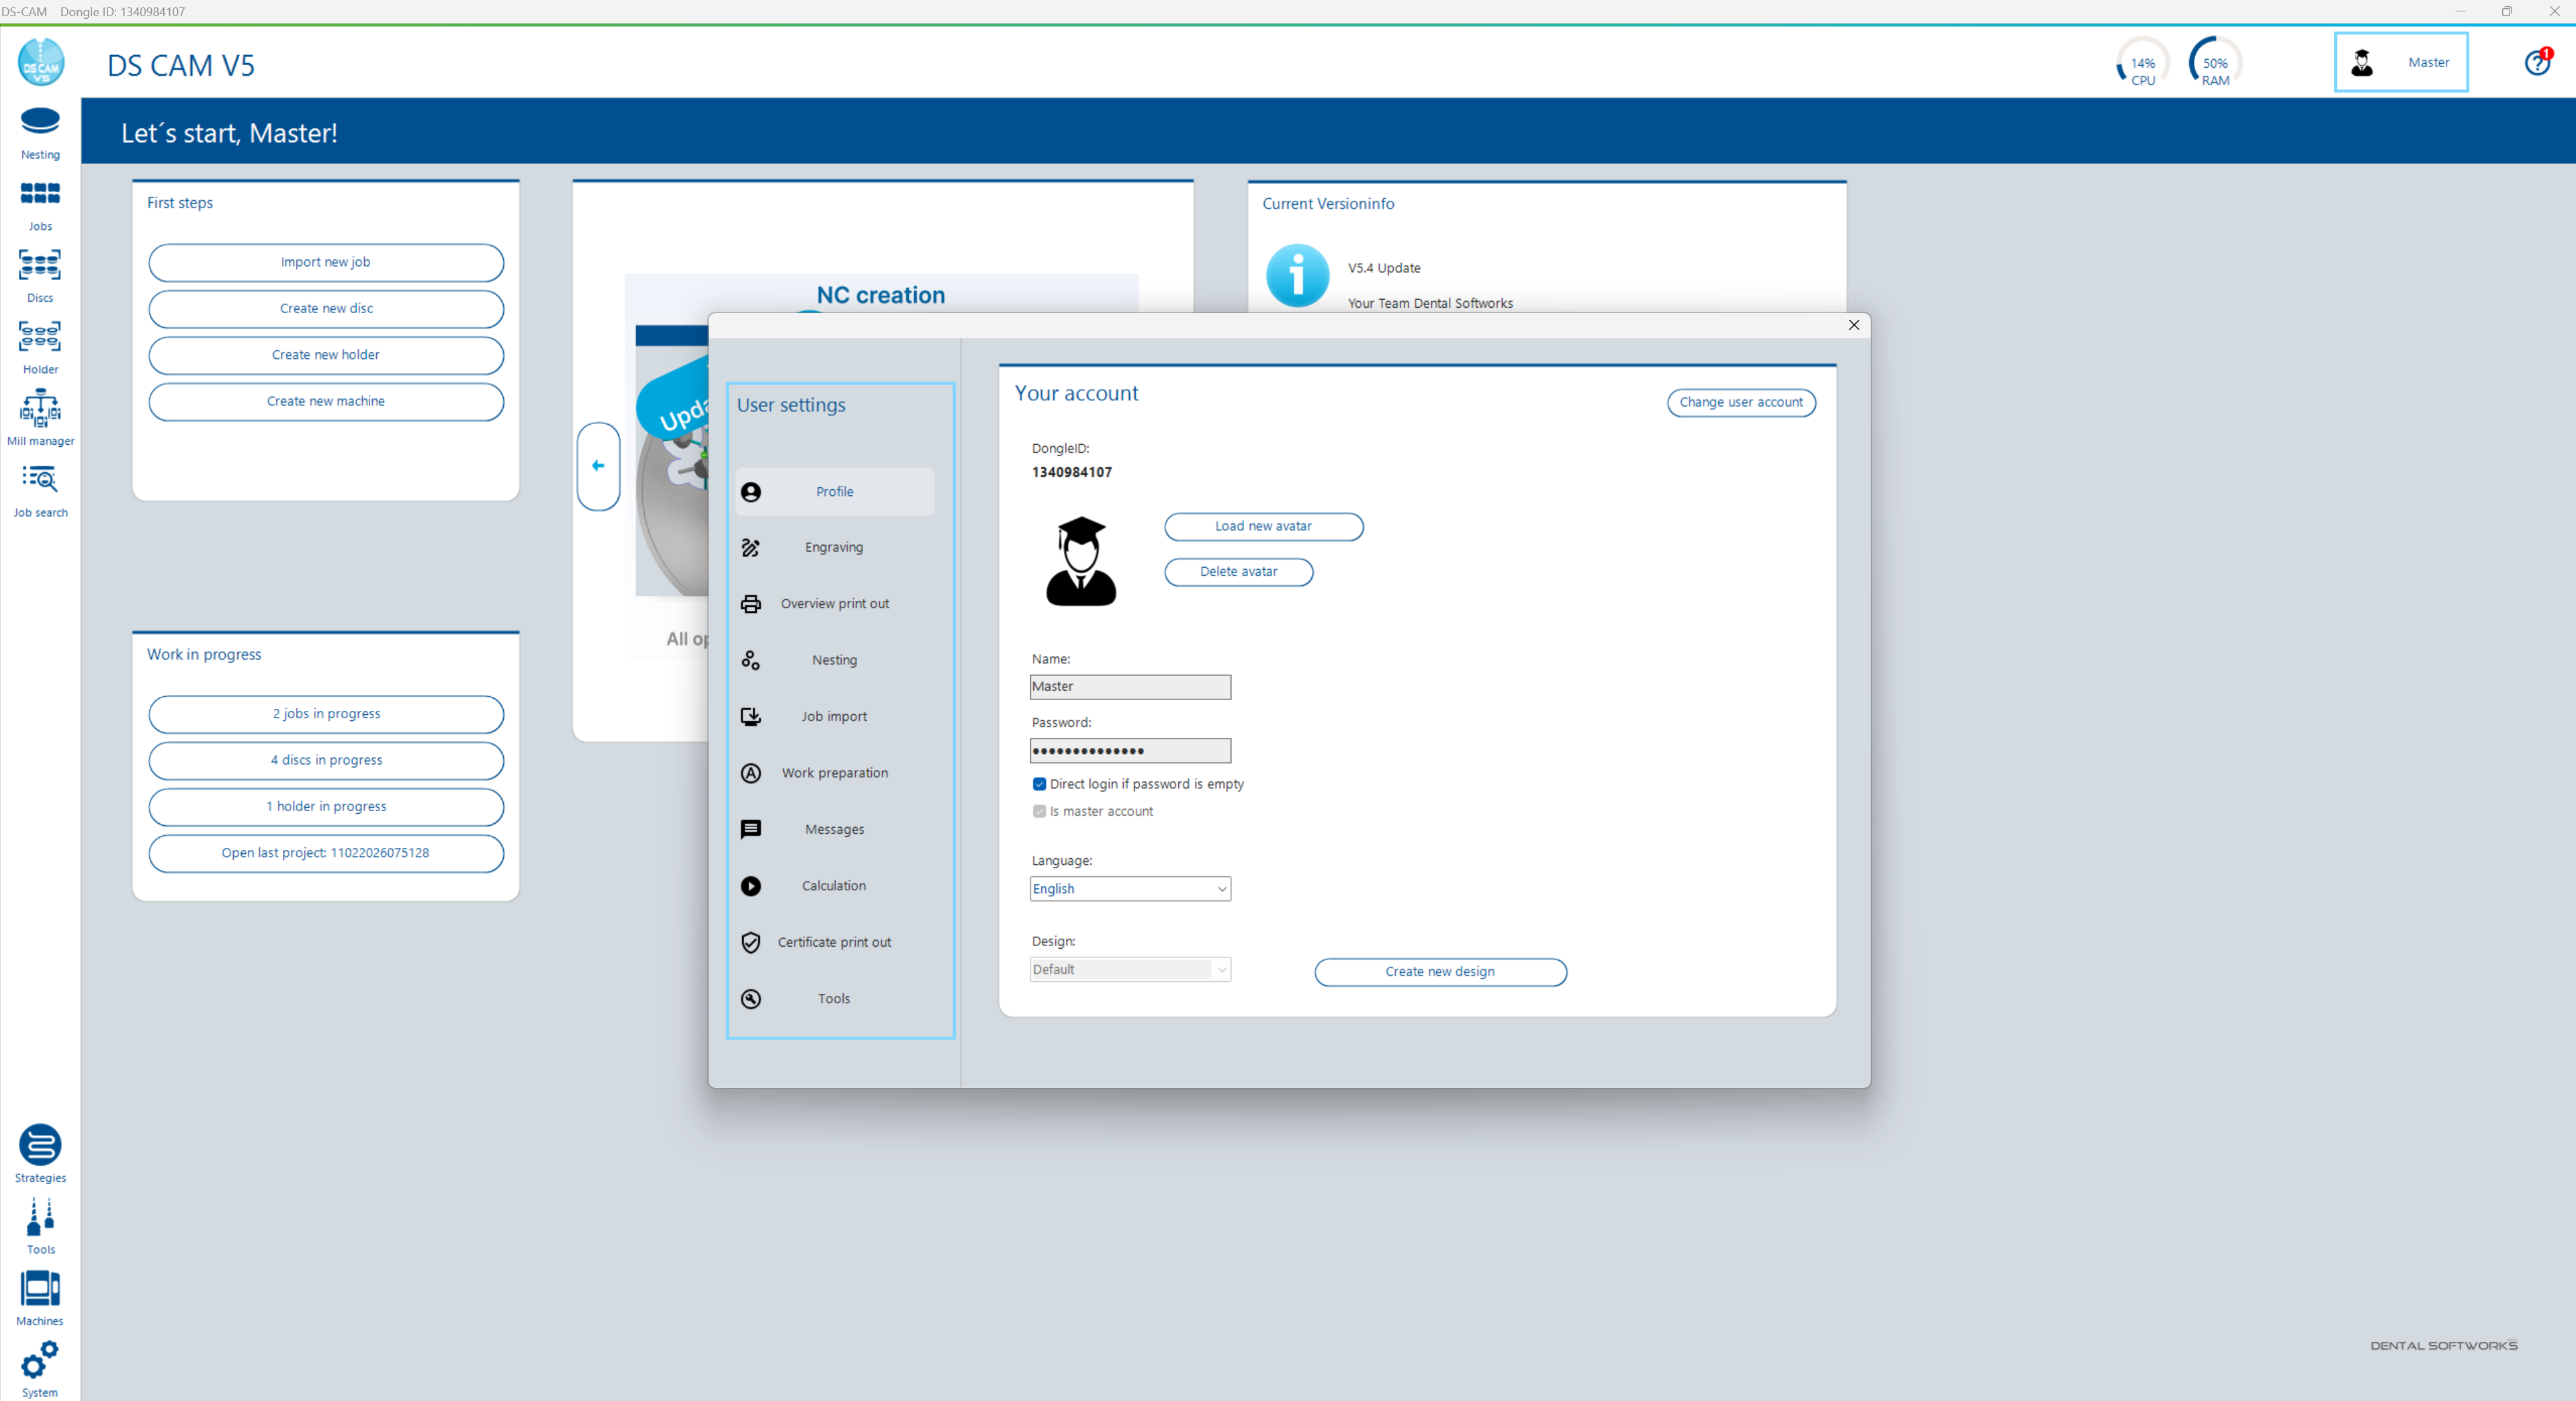
Profile Profile
Der Bereich „Your account" zeigt Ihre Kontoinformationen und ermöglicht die Personalisierung: The "Your account" section shows your account information and allows personalisation:
| Feld / ElementField / Element | BeschreibungDescription |
|---|---|
| DongleID | Eindeutige Identifikationsnummer Ihres Lizenz-Dongles (nur Anzeige)Unique identification number of your licence dongle (display only) |
| Avatar | Benutzerbild – über „Load new avatar" hochladen oder „Delete avatar" entfernenUser image – upload via "Load new avatar" or remove via "Delete avatar" |
| Name / Password | Benutzername und Passwort des aktuellen KontosUsername and password of the current account |
| Direct login if password is empty | Wenn aktiviert, wird das Login-Fenster übersprungen, sofern kein Passwort gesetzt istWhen enabled, the login window is skipped if no password is set |
| Is master account | Kennzeichnet den Master-Account (DSW-reserviert). Schaltet alle Einstellungsbereiche frei – es kann nur einen Master-Account gebenIdentifies the master account (DSW-reserved). Unlocks all settings areas – only one master account can exist |
| Language | Sprache der Benutzeroberfläche (Dropdown)User interface language (dropdown) |
| Design | Farbschema der Software. „Create new design" öffnet den Color ConfiguratorColour scheme of the software. "Create new design" opens the Color Configurator |
| Change user account | Wechselt den angemeldeten Benutzer (Button oben rechts)Switches the logged-in user (button top right) |
Engraving Engraving
Konfiguration der Gravurfunktion, die Texte direkt auf Fräsobjekte fräst: Configuration of the engraving function that mills text directly onto milling objects:
| FeldField | BeschreibungDescription |
|---|---|
| Example text | Vorschautext für die Gravurvorschau rechtsPreview text for the engraving preview on the right |
| Font height | Schrifthöhe in mm (1,0–5,0 mm)Font height in mm (1.0–5.0 mm) |
| Real text size | Berechnete tatsächliche Textgröße in mm (nur Anzeige)Calculated actual text size in mm (display only) |
| Font type | Verwendete Schriftart (z.B. ISOCP3)Font used (e.g. ISOCP3) |
| Preset entry | Dropdown für vordefinierte GravurtexteDropdown for predefined engraving texts |
| Preview | Live-Vorschau der Gravur auf einem Fräsobjekt in der RondeLive preview of the engraving on a milling object in the disc |
Overview print out Overview Print Out
Konfiguriert, welche Informationen auf dem Übersichtsausdruck eines Ronden-/Halterprojekts erscheinen: Configures which information appears on the overview printout of a disc/holder project:
| EinstellungSetting | BeschreibungDescription |
|---|---|
| Line numbering | Art der Zeilennummerierung (z.B. „following number")Type of line numbering (e.g. "following number") |
| CheckboxenCheckboxes | Patient, Filename, Dentist, Date of placing, Milltime, Tooth color, Additional Info, Shrink factor – jedes Feld kann einzeln ein-/ausgeblendet werdenPatient, Filename, Dentist, Date of placing, Milltime, Tooth color, Additional Info, Shrink factor – each field can be individually shown/hidden |
Nesting Nesting
Zentrale Einstellungen für das Nesting-Verhalten. Diese Werte gelten als Voreinstellungen für alle neuen Projekte. Details zu den einzelnen Funktionen finden Sie in Kapitel 5 – Nesting & Berechnung. Central settings for nesting behaviour. These values serve as defaults for all new projects. Details on individual functions can be found in Chapter 5 – Nesting & Calculation.
| BereichArea | EinstellungenSettings |
|---|---|
| Parameters and Visualisation | Correction Factor Material Usage (1,0–2,5), Mesh size (mm), Rotation step (°), Show middle crossCorrection Factor Material Usage (1.0–2.5), Mesh size (mm), Rotation step (°), Show middle cross |
| Workflow optimization | Job direct movable after adding (Autoplacement deaktivieren), Start Add Bar Mode after adding job (Autobars)Job direct movable after adding (disable autoplacement), Start Add Bar Mode after adding job (autobars) |
| Prevent calculation with collision | On job-mill area collision, On job-job collision (jeweils nur für Discs umschaltbar)On job-mill area collision, On job-job collision (each switchable for discs only) |
| Settings for minimum bars | Use specification from job type, Number of minimum bars, Allow milling without barsUse specification from job type, Number of minimum bars, Allow milling without bars |
| Autonesting - General Settings | Distance between jobs (0,1–1,0 mm)Distance between jobs (0.1–1.0 mm) |
| Multilayer nesting settings | Default job position in Z (Standard/Abstand von Oberseite/Herstellerstandard), Abstandswert (0,1–5,0 mm)Default job position in Z (Standard/distance from top/manufacturer default), offset value (0.1–5.0 mm) |
Job import Job Import
Einstellungen für den Job-Importvorgang. Details zum Import-Workflow finden Sie in Kapitel 3 – Jobs. Settings for the job import process. Details on the import workflow can be found in Chapter 3 – Jobs.
| BereichArea | EinstellungenSettings |
|---|---|
| Import Filter Settings | 10 Filterslots für die Reihenfolge der Dateityp-Filter im Import-Ordner-Dialog (z.B. „All formats", „STL / (*.stl)")10 filter slots for the file type filter order in the import folder dialog (e.g. "All formats", "STL / (*.stl)") |
| Import Data Settings | ExoCAD-spezifische Optionen: Closing surface on screwed jobs, Import chewing surface as fissureExoCAD-specific options: Closing surface on screwed jobs, Import chewing surface as fissure |
| Import Dialog | Show Importdialog (Never / Always / Only if needed). Bei „Only if needed" definieren 6 Checkboxen die Auslöser: Material unknown, Jobtype unknown, Blanktype unknown, Mandatory fields incomplete, Full dentures, STL ImportShow Importdialog (Never / Always / Only if needed). With "Only if needed", 6 checkboxes define the triggers: Material unknown, Jobtype unknown, Blanktype unknown, Mandatory fields incomplete, Full dentures, STL Import |
Work preparation Work Preparation
Einstellungen für die Arbeitsvorbereitung. Details zu den Arbeitsvorbereitungs-Schritten finden Sie in Kapitel 3 – Jobs. Settings for work preparation. Details on work preparation steps can be found in Chapter 3 – Jobs.
| BereichArea | EinstellungenSettings |
|---|---|
| Optimized workflow | Select next contour curve after finish selection, Select next direction curve after finish selection, Enable auto detection – beschleunigen das Arbeiten mit Kontur- und EinschubkurvenSelect next contour curve after finish selection, Select next direction curve after finish selection, Enable auto detection – speed up working with contour and direction curves |
| Other settings | Patient and Dentist are must-filled fields (Pflichtfelder erzwingen), Engraving text required (Gravur als Pflicht), Show all Job Types (alle Jobtypen anzeigen, nicht nur passende)Patient and Dentist are must-filled fields (enforce required fields), Engraving text required (engraving as mandatory), Show all Job Types (show all job types, not just matching ones) |
Messages Messages
Steuert, welche Informations- und Warnmeldungen angezeigt werden. Durch Deaktivieren einzelner Meldungen können Sie Bestätigungsdialoge unterdrücken, die Sie im Arbeitsalltag nicht benötigen. Controls which information and warning messages are displayed. By deactivating individual messages, you can suppress confirmation dialogs that you do not need in your daily workflow.
| BereichArea | MeldungenMessages |
|---|---|
| Information | Tool/strategy/machine dialog - service personnel (Service-Meldungen), Message when calculation finishes (Benachrichtigung bei abgeschlossener Berechnung), Message on CAM start (Startmeldungen)Tool/strategy/machine dialog - service personnel (service messages), Message when calculation finishes (notification on completed calculation), Message on CAM start (start messages) |
| Warnungen (CAM)Warnings (CAM) | Warnungen beim Löschen von: Tooth, Bar, Drop, Tooth to trash. Warnungen bei Farb- oder Maschinenabweichung beim PlatzierenWarnings when deleting: Tooth, Bar, Drop, Tooth to trash. Warnings on colour or machine mismatch when placing |
| Warnungen (AV / Allgemein)Warnings (WP / General) | Warning when deleting jobs (AV), Warning when job is not completely defined (AV), Warning when job/blank will be archived, Warning when project will be deletedWarning when deleting jobs (WP), Warning when job is not completely defined (WP), Warning when job/blank will be archived, Warning when project will be deleted |
Calculation Calculation
Steuert die Ressourcenverteilung bei der Fräsbahnberechnung im Hintergrund: Controls resource allocation during background toolpath calculation:
| EinstellungSetting | BeschreibungDescription |
|---|---|
| CPU-Auslastung (Schieberegler)CPU Usage (slider) |
High: Volle CPU-Auslastung, Weiterarbeiten nicht möglich bis Berechnung fertig. Medium: Mittlere Auslastung, CAM kann etwas langsamer werden. Low: Geringe Auslastung, besseres Arbeiten in der CAM, langsamere Berechnung. High: Full CPU usage, cannot work until calculation is finished. Medium: Medium usage, CAM may slow down slightly. Low: Low usage, better working in CAM, slower calculation. |
| Display | Show CPU / Show RAM – Auslastungsanzeige während der Berechnung ein-/ausblendenShow CPU / Show RAM – show/hide usage display during calculation |
| NVIDIA CUDA | Use NVIDIA CUDA for calculation – lagert die automatische Erkennung von Retentionslöchern und die Erstellung der notwendigen Tiefenbegrenzungen auf die Grafikkarte aus (erfordert kompatible NVIDIA-Grafikkarte)Use NVIDIA CUDA for calculation – offloads the automatic detection of retention holes and the creation of the necessary depth limitations to the graphics card (requires compatible NVIDIA graphics card) |
Certificate print out Certificate Print Out
Konfiguriert den Zertifikatsausdruck pro Maschine. Für jede angelegte Maschine kann eine Zertifikats-Vorlage (Sprache) gewählt oder die Funktion deaktiviert werden (OFF / AUS). Configures the certificate printout per machine. For each configured machine, a certificate template (language) can be selected or the function can be disabled (OFF / AUS).
Tools Tools
Einstellungen für die Werkzeugverwaltung (Details siehe Kapitel 8 – Werkzeuge): Settings for tool management (details in Chapter 8 – Tools):
| EinstellungSetting | BeschreibungDescription |
|---|---|
| Show path length | Zeigt die Fräsweg-Spalte (Standzeit-Überwachung) in der Werkzeugübersicht an. Der Fräsweg wird bei jedem Posting hochgezählt und kann bei Werkzeugwechsel zurückgesetzt werden.Shows the path length column (tool life monitoring) in the tool overview. The path length is incremented with each posting and can be reset on tool change. |
10.8 Systemeinstellungen 10.8 System Settings
Die Systemeinstellungen erreichen Sie über die linke Navigationsleiste unter System Einstellungen. Im Gegensatz zu den Benutzereinstellungen gelten diese global für die gesamte Installation – unabhängig vom angemeldeten Benutzer. Der Dialog enthält 8 Kategorien: Access the System Settings via the left navigation bar under System Settings. Unlike user settings, these apply globally to the entire installation – regardless of the logged-in user. The dialog contains 8 categories:
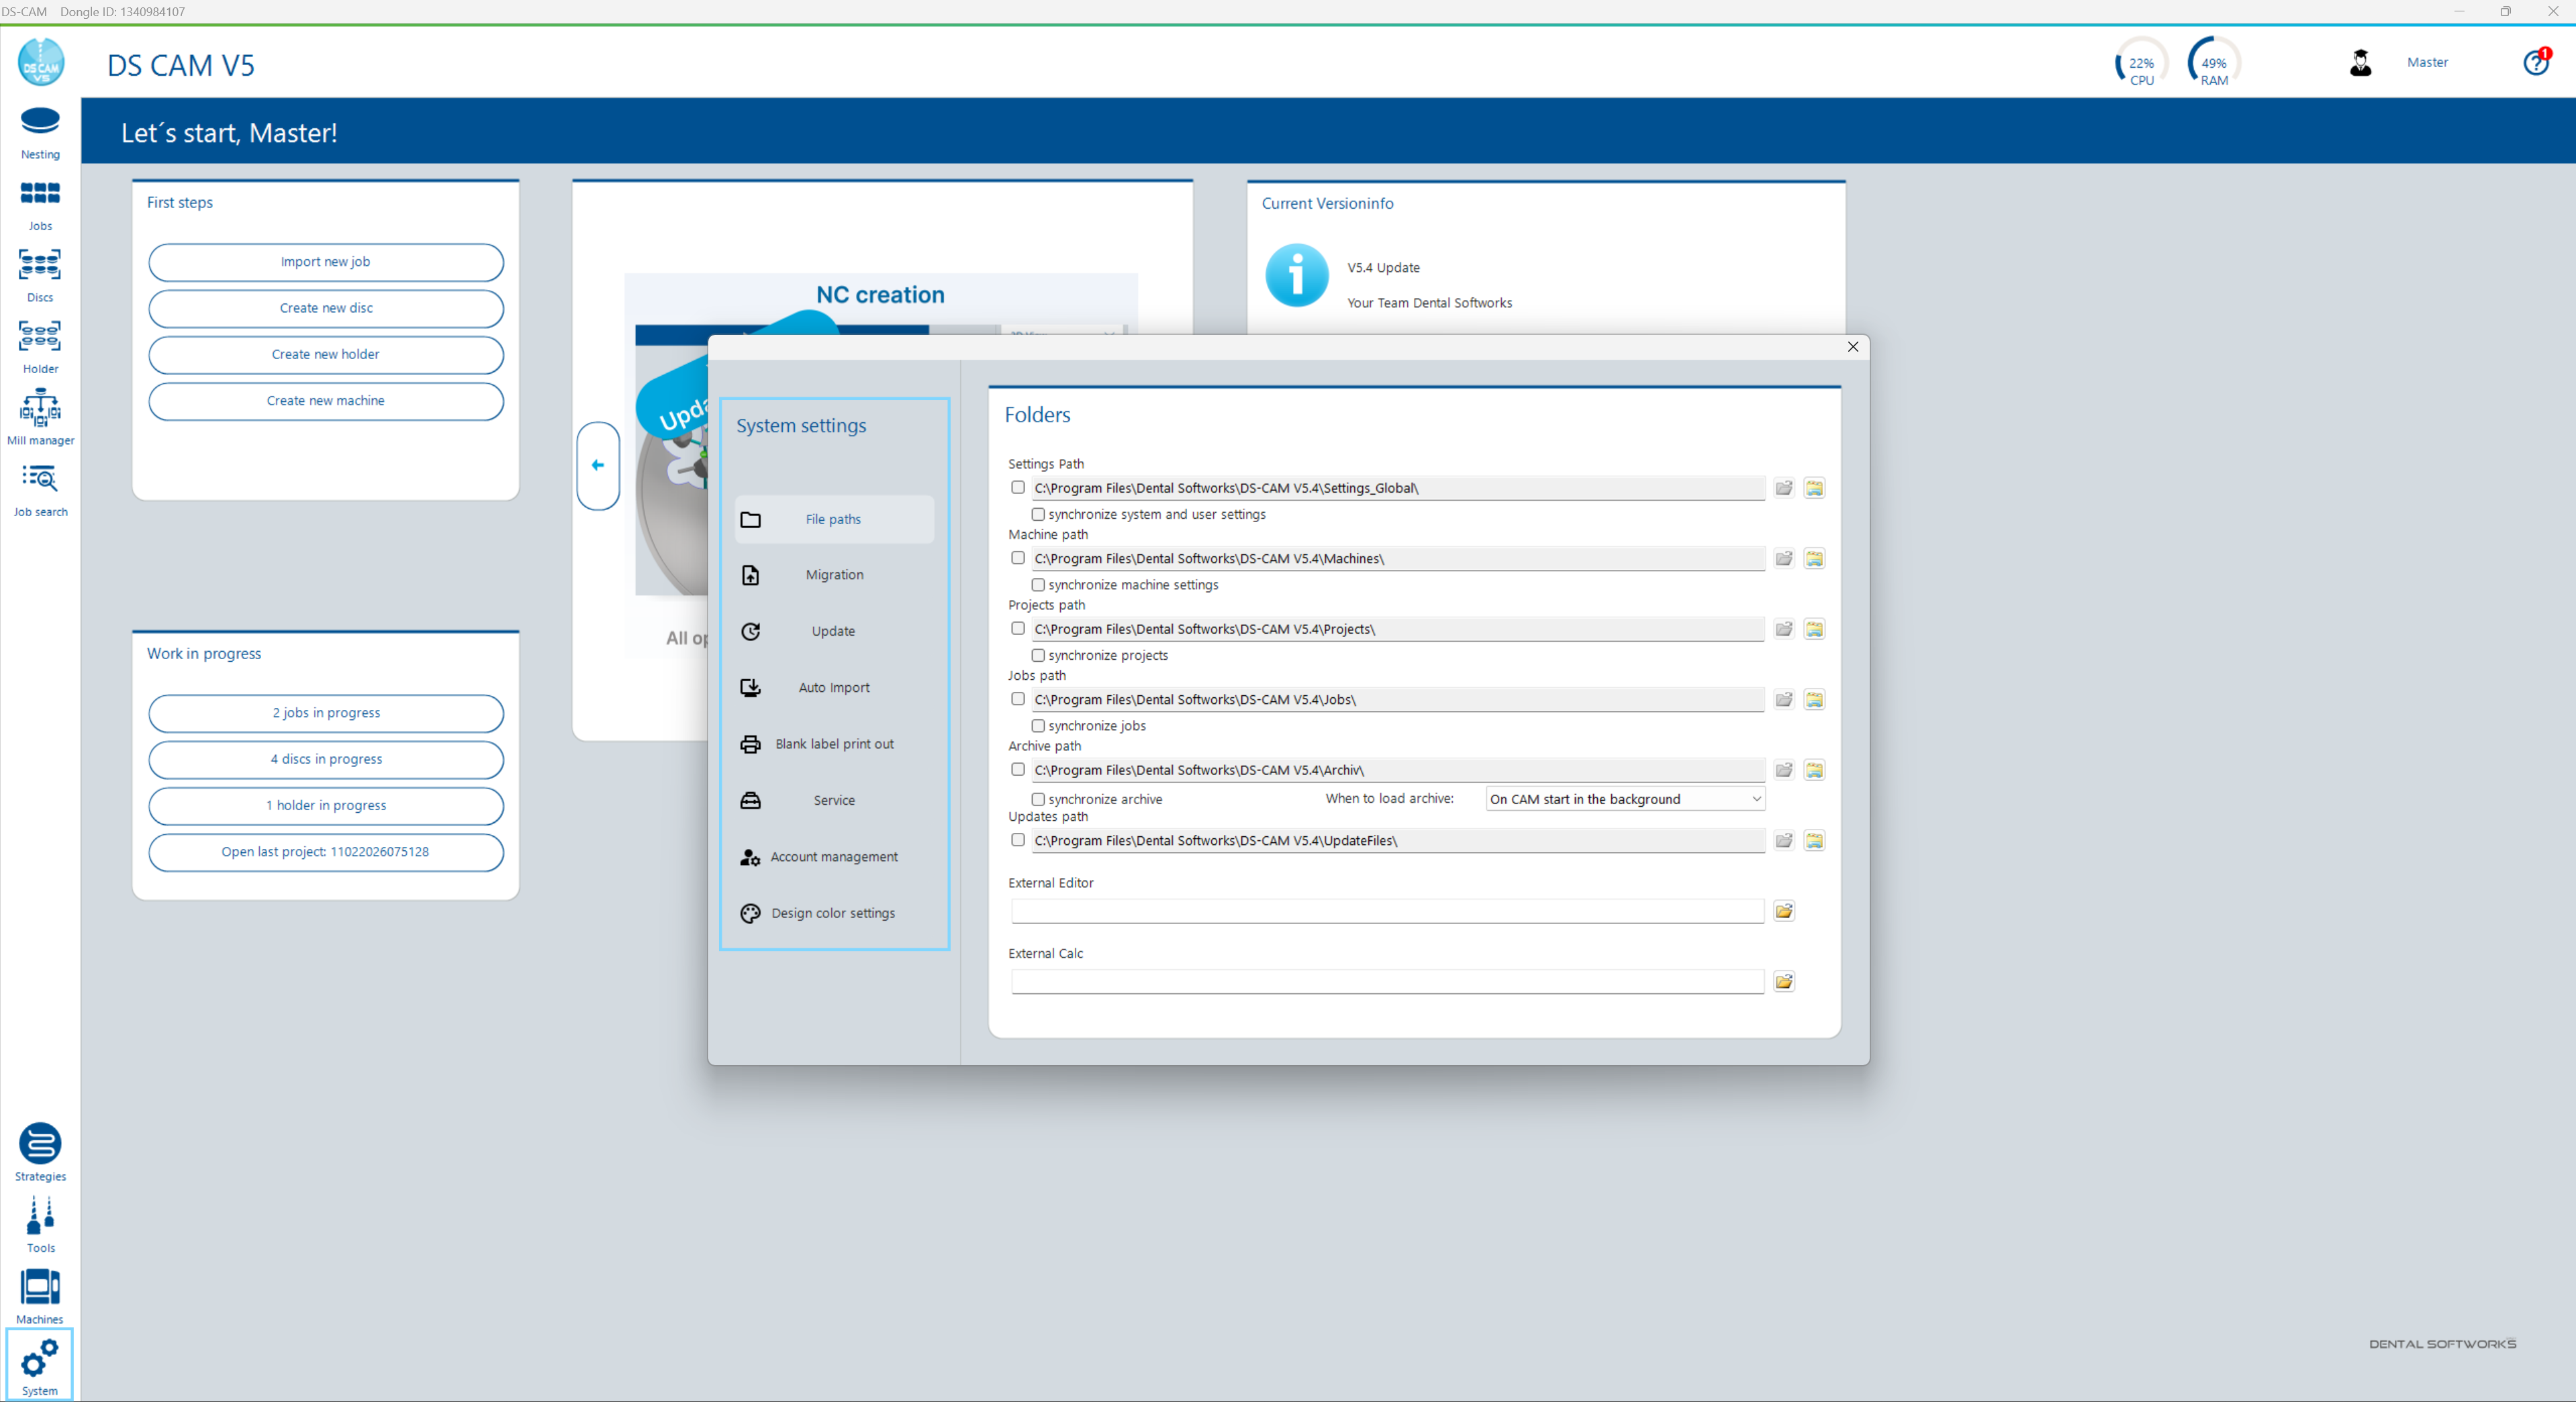
File paths File Paths
Definiert die Speicherorte für alle DS-CAM-Daten. Der Standard-Installationspfad ist C:\Program Files\Dental Softworks\DS-CAM V5.4\.
Defines the storage locations for all DS CAM data. The default installation path is C:\Program Files\Dental Softworks\DS-CAM V5.4\.
| PfadPath | InhaltContent |
|---|---|
| Settings Path | System- und BenutzereinstellungenSystem and user settings |
| Machine path | MaschinenkonfigurationenMachine configurations |
| Projects path | Ronden-/HalterprojekteDisc/holder projects |
| Jobs path | Importierte JobsImported jobs |
| Archive path | Archivierte ProjekteArchived projects |
| Updates path | Heruntergeladene Update-DateienDownloaded update files |
Migration Migration
Ermöglicht die Migration von Projekten und Archiven aus älteren Versionen (PrograMill CAM V3/V4.0 sowie V4.1 und höher). Zwei Tabs stehen zur Verfügung: Migration V3/V4.0 und Migration V4.1 and higher. Pro Tab können ein Projektordner und ein Archivordner für die Migration ausgewählt werden. Enables migration of projects and archives from older versions (PrograMill CAM V3/V4.0 and V4.1 and higher). Two tabs are available: Migration V3/V4.0 and Migration V4.1 and higher. Each tab allows selecting a project folder and an archive folder for migration.
Update Update
Konfiguriert das Update-Verhalten: Configures update behaviour:
| EinstellungSetting | BeschreibungDescription |
|---|---|
| Messages | Benachrichtigungen für: Release (Standard-Updates), Beta und Alpha (jeweils passwortgeschützt, nur für Service)Notifications for: Release (standard updates), Beta and Alpha (each password-protected, service only) |
| Update Download Control | Steuert das Download-Verhalten (z.B. „Ask before download")Controls download behaviour (e.g. "Ask before download") |
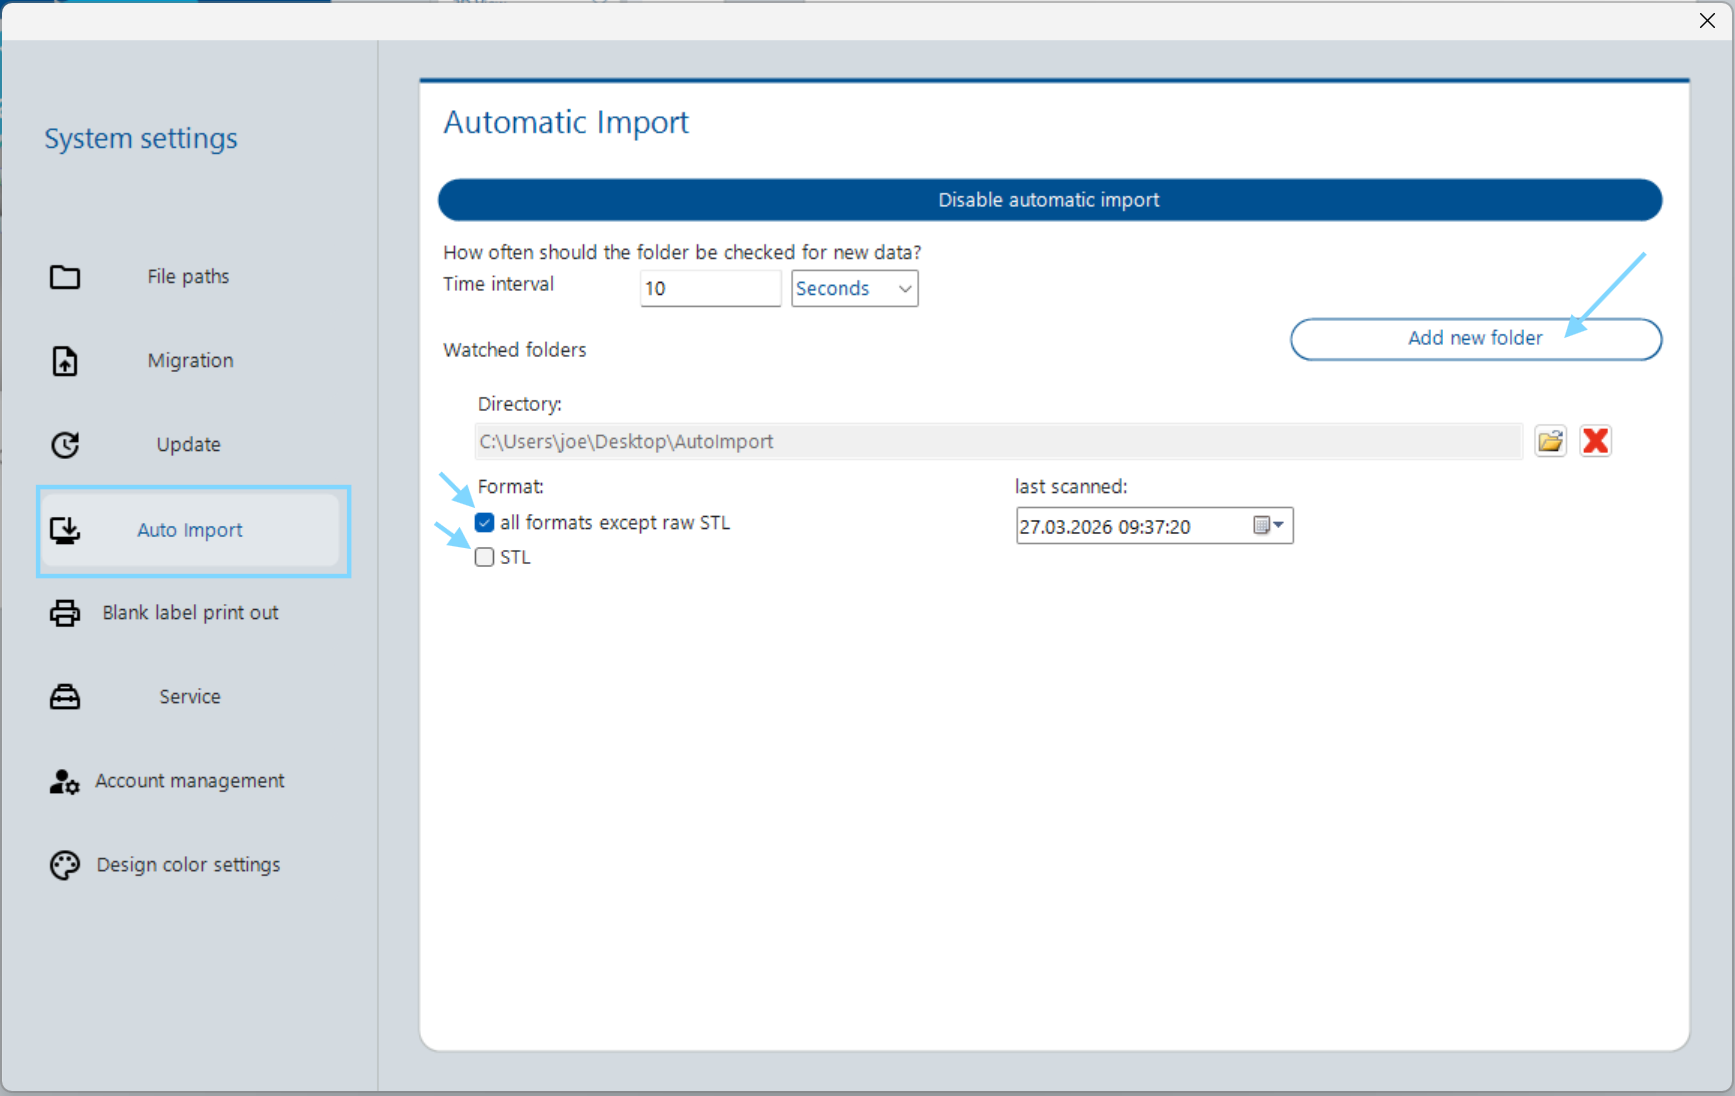
Auto Import Auto Import
Konfiguration des automatischen Imports (STL Grabber). Details zur Funktion finden Sie in Kapitel 3 – Jobs. Configuration of automatic import (STL Grabber). Details on the function can be found in Chapter 3 – Jobs.
| EinstellungSetting | BeschreibungDescription |
|---|---|
| Enable/Disable automatic import | Aktiviert oder deaktiviert den automatischen Import globalEnables or disables automatic import globally |
| Time interval | Prüfintervall für neue Dateien (z.B. 30 Sekunden)Check interval for new files (e.g. 30 seconds) |
| Watched folders | Liste der überwachten Ordner. Pro Ordner: Pfad, Format (all formats except raw STL / STL), Zeitstempel der letzten Prüfung. Über „Add new folder" hinzufügen, über das rote X entfernen.List of watched folders. Per folder: path, format (all formats except raw STL / STL), timestamp of last scan. Add via "Add new folder", remove via the red X. |
Blank label print out Blank Label Print Out
Einstellungen für den Etikettendruck auf physische Ronden/Scheiben: Settings for label printing on physical discs/blanks:
| EinstellungSetting | BeschreibungDescription |
|---|---|
| Font size | Schriftgröße in Pixel (z.B. 16 pix)Font size in pixels (e.g. 16 pix) |
| Label width | Etikettenbreite in mm (z.B. 60 mm)Label width in mm (e.g. 60 mm) |
| Label height | Etikettenhöhe in mm (z.B. 10 mm)Label height in mm (e.g. 10 mm) |
| Landscape mode | Querformat für den EtikettendruckLandscape mode for label printing |
Service und Account management Service and Account Management
Diese beiden Bereiche sind dem First Level Support / Dental Softworks vorbehalten und für den Standard-Anwender nicht relevant. Service enthält erweiterte Diagnosefunktionen, Account management ermöglicht die Verwaltung der Benutzerkonten. These two areas are reserved for First Level Support / Dental Softworks and are not relevant for the standard user. Service contains advanced diagnostic functions, Account management allows management of user accounts.
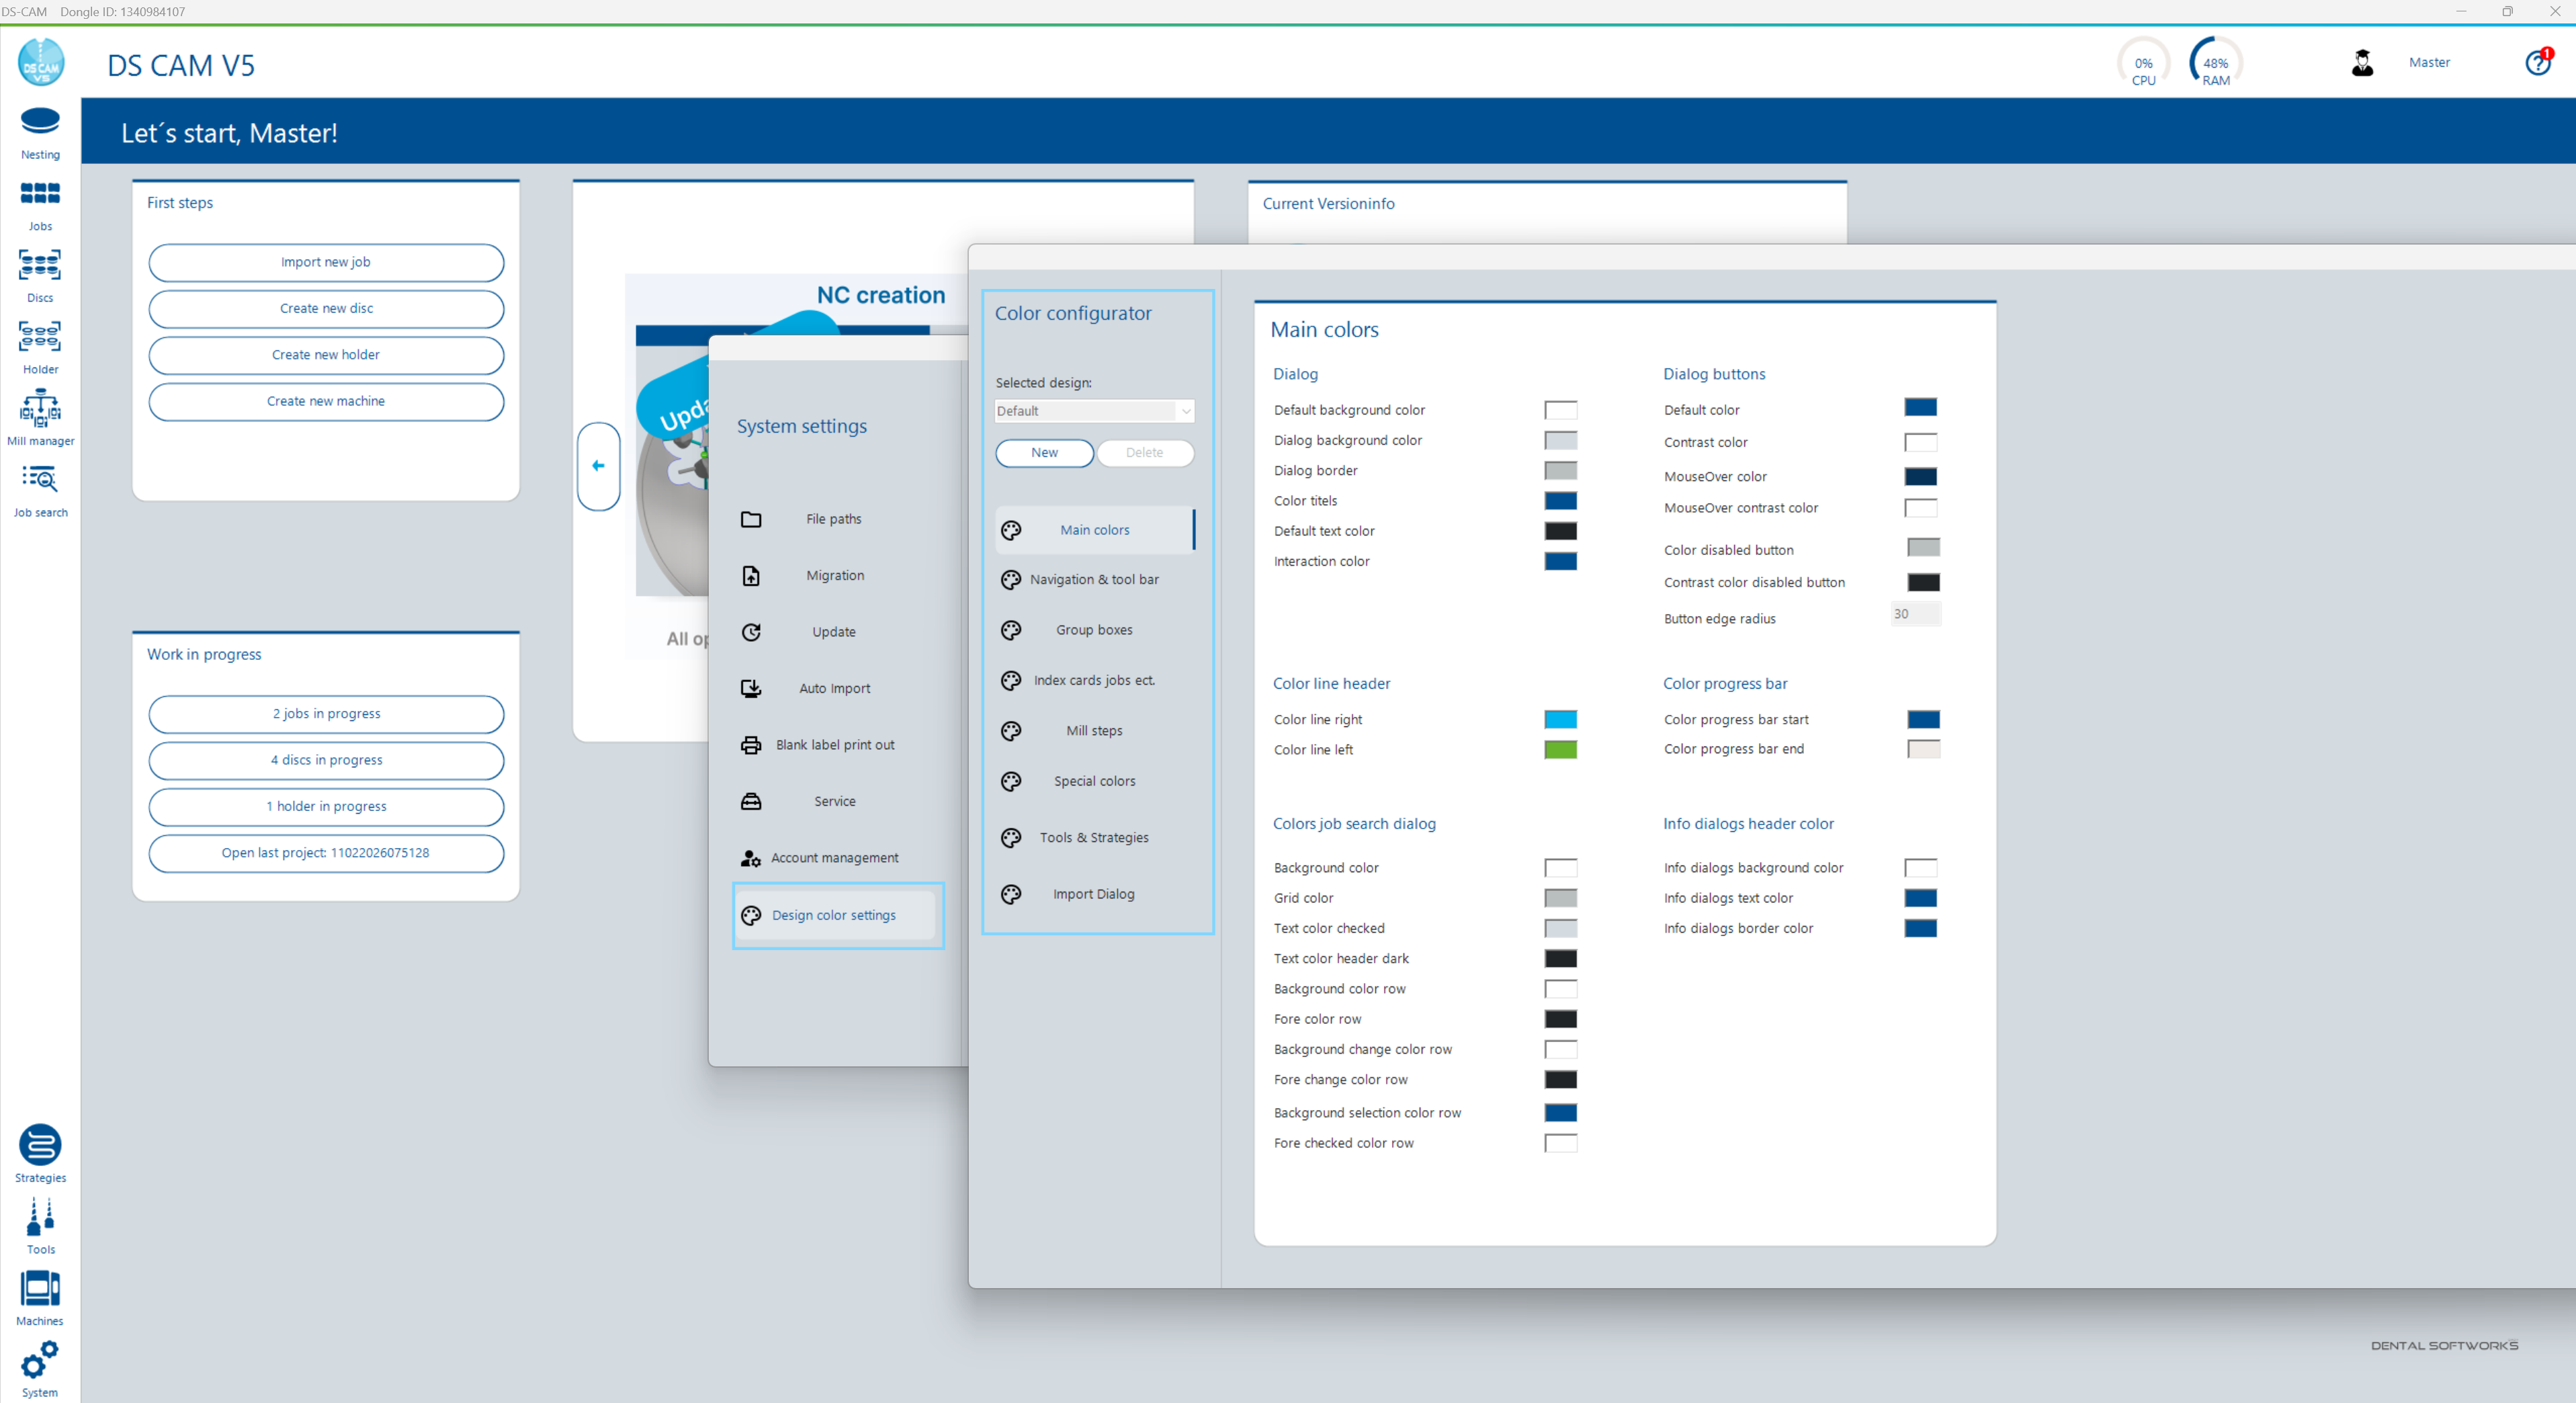
Design color settings (Color Configurator) Design Colour Settings (Colour Configurator)
Der Color Configurator ermöglicht das Erstellen und Bearbeiten eigener Farbschemata für die DS-CAM-Oberfläche. Er ist sowohl über die Systemeinstellungen als auch über die Benutzereinstellungen (Profile → Create new design) erreichbar. The Colour Configurator allows creating and editing custom colour schemes for the DS CAM interface. It is accessible both via System Settings and via User Settings (Profile → Create new design).
| ElementElement | BeschreibungDescription |
|---|---|
| Selected design | Dropdown zur Auswahl des zu bearbeitenden Designs (z.B. „Default")Dropdown to select the design to edit (e.g. "Default") |
| New / Delete | Neues Design erstellen oder bestehendes löschenCreate new design or delete existing one |
| 8 Farbkategorien8 Colour Categories | Main colors, Navigation & tool bar, Group boxes, Index cards jobs ect., Mill steps, Special colors, Tools & Strategies, Import Dialog – jede Kategorie enthält individuelle Farbwerte, die per Color Picker angepasst werden könnenMain colors, Navigation & tool bar, Group boxes, Index cards jobs ect., Mill steps, Special colors, Tools & Strategies, Import Dialog – each category contains individual colour values adjustable via colour picker |
Das erstellte Design kann anschließend in den Benutzereinstellungen unter Profile → Design ausgewählt werden. The created design can then be selected in User Settings under Profile → Design.